


Thinkium POS Node Create Course 太空猫节点安装教程
一.Amazon cloud account registration(注册亚马逊云账户)
http://www.tkm.cn/tao/TkmPosCourse.rar 教程&软件包下载并解压 Download tutorials & Software
一.1.Preparations for account registration(账号注册准备事项)
1.A common email account, which will be used as the AWS login account
(一个常用邮箱账户,这个邮箱会作为的AWS登录账户)
2.Mobile phone or phone number, bank card that can pay US dollars
(手机或电话号码,支付美元的Visa、MasterCard等信用卡)
3. Choose personal account or company account according to the situation
(根据情况选择个人账户还是公司账户)
一.2.AWS account registration process(AWS账号注册流程)
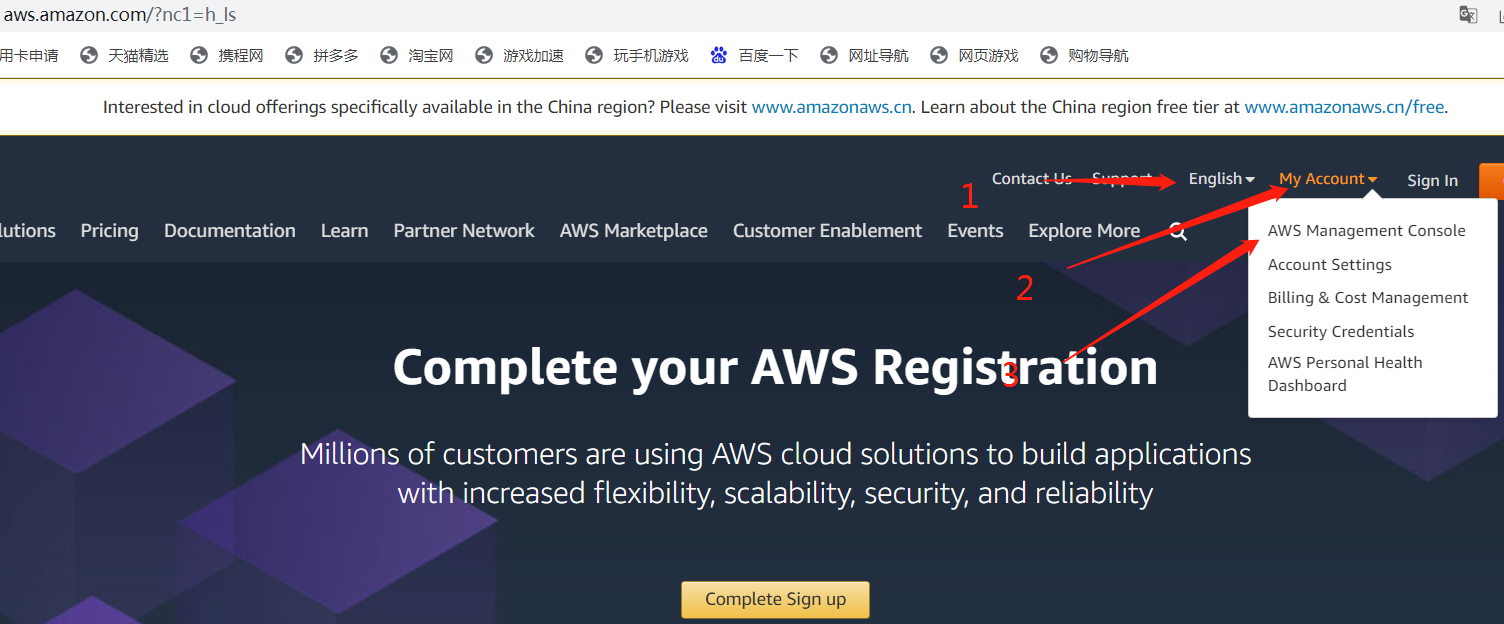
1.https://aws.amazon.com/ Open the AWS registration page and select {1 in the upper right corner Language, 2 My account, 3AWS Management console, jump to the registration page 4 Create a new AWS account (Log in directly with AWS account:Root user email address)
(找开AWS注册网页,https://aws.amazon.com/,右上角选择 1.语言、2.我的账户、3AWS管理管制台,跳转到注册页面4.创建新的AWS账户。
有AWS账户直接登录:根电子邮件地址)
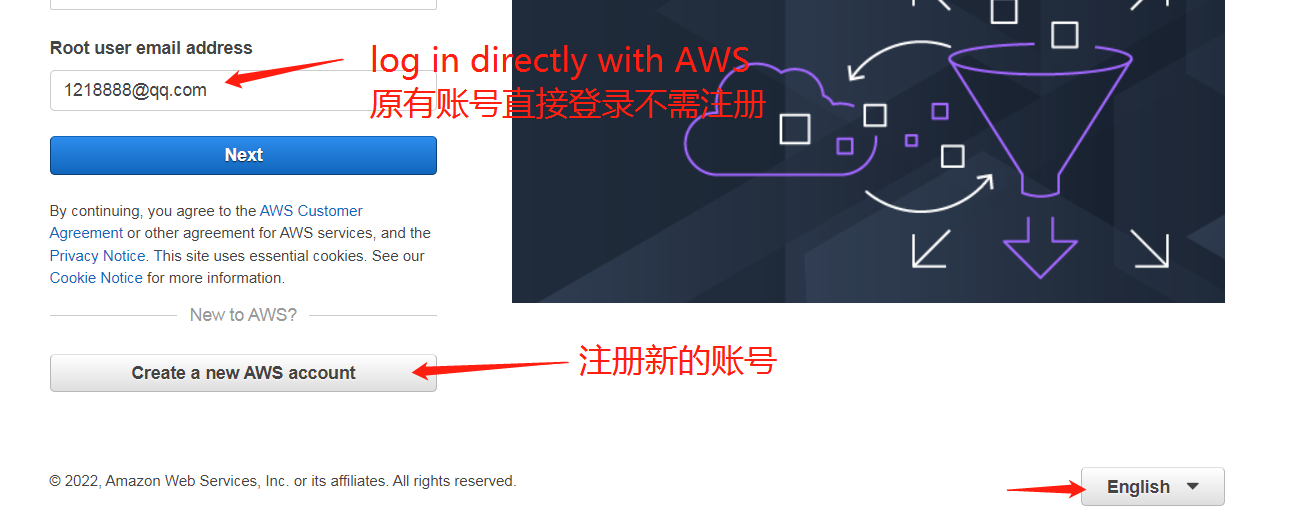
2.Register a new AWS account (注册新的AWS账户)
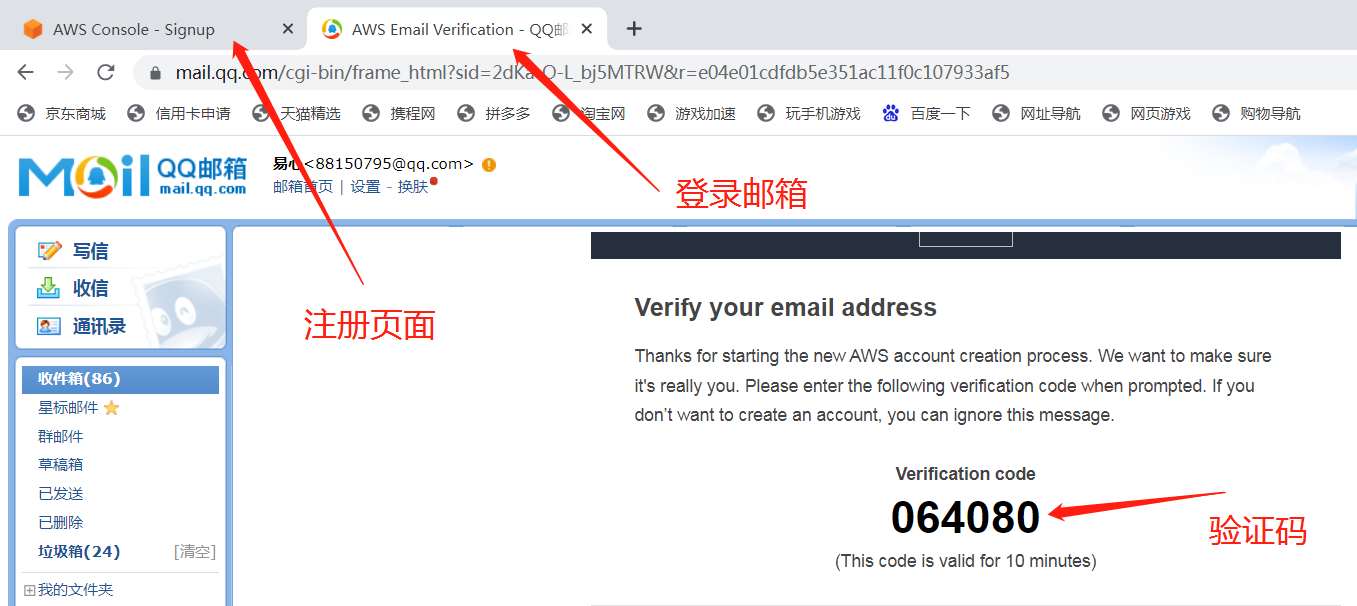
1. Enter the Root user email address, 2. Enter the AWS account name (nickname) for later settings. Use this user name uniformly (it can be modified on the console after registration) 3. Verify the email address and log in to the mailbox to view the verification code.
1输入注册邮箱号、2输入AWS用户名(昵称)后期设置统一用这个用户名(注册后可以控制台修改)3验证邮箱地址,登录邮箱查看验证码。

Keep the registration page, open a new page, log in to the mailbox and view the verification code(保留注册页面,打开新页面登录邮箱查看验证码)
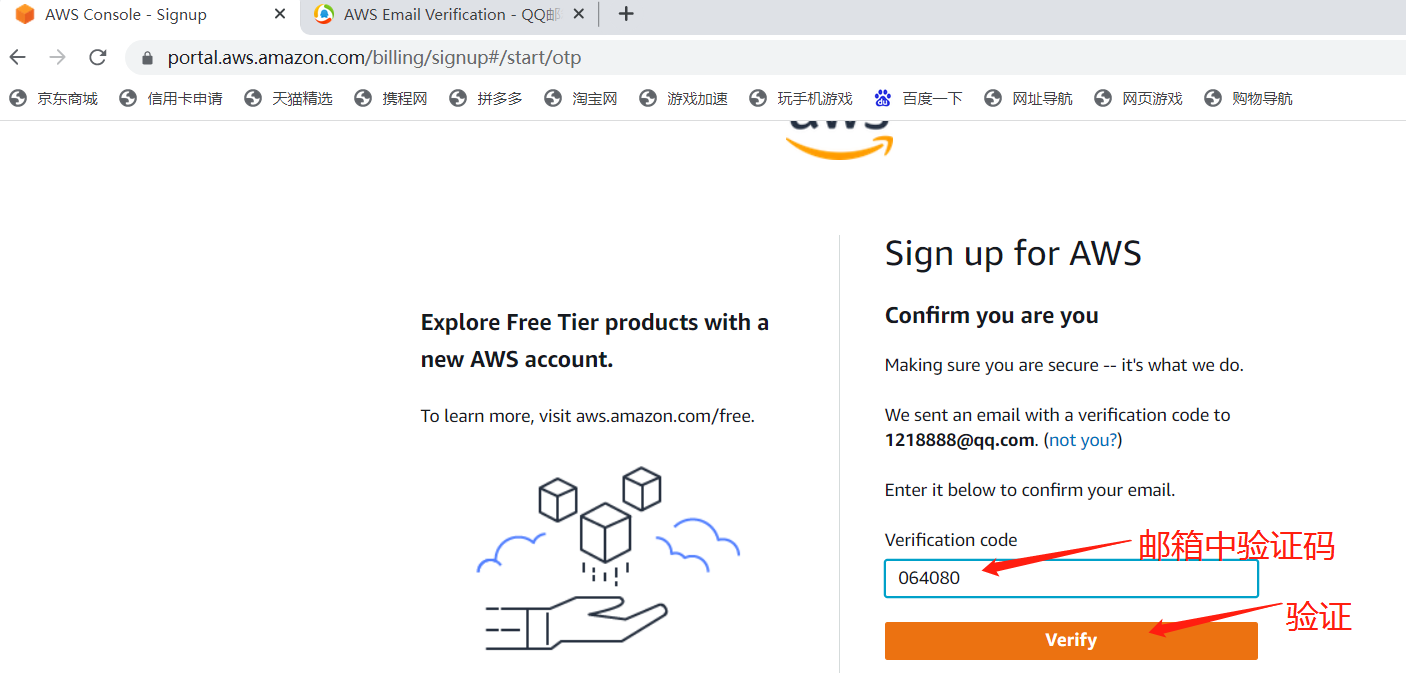
3.After passing the verification, start the trial registration 验证通过后,开始正式注册。
1 Enter email address (just verified) 2 enter password aws user name (nickname) and3 click to continue
1输入电子邮箱(刚验证过的)2输入密码 AWS用户名(昵称) 3点 继续

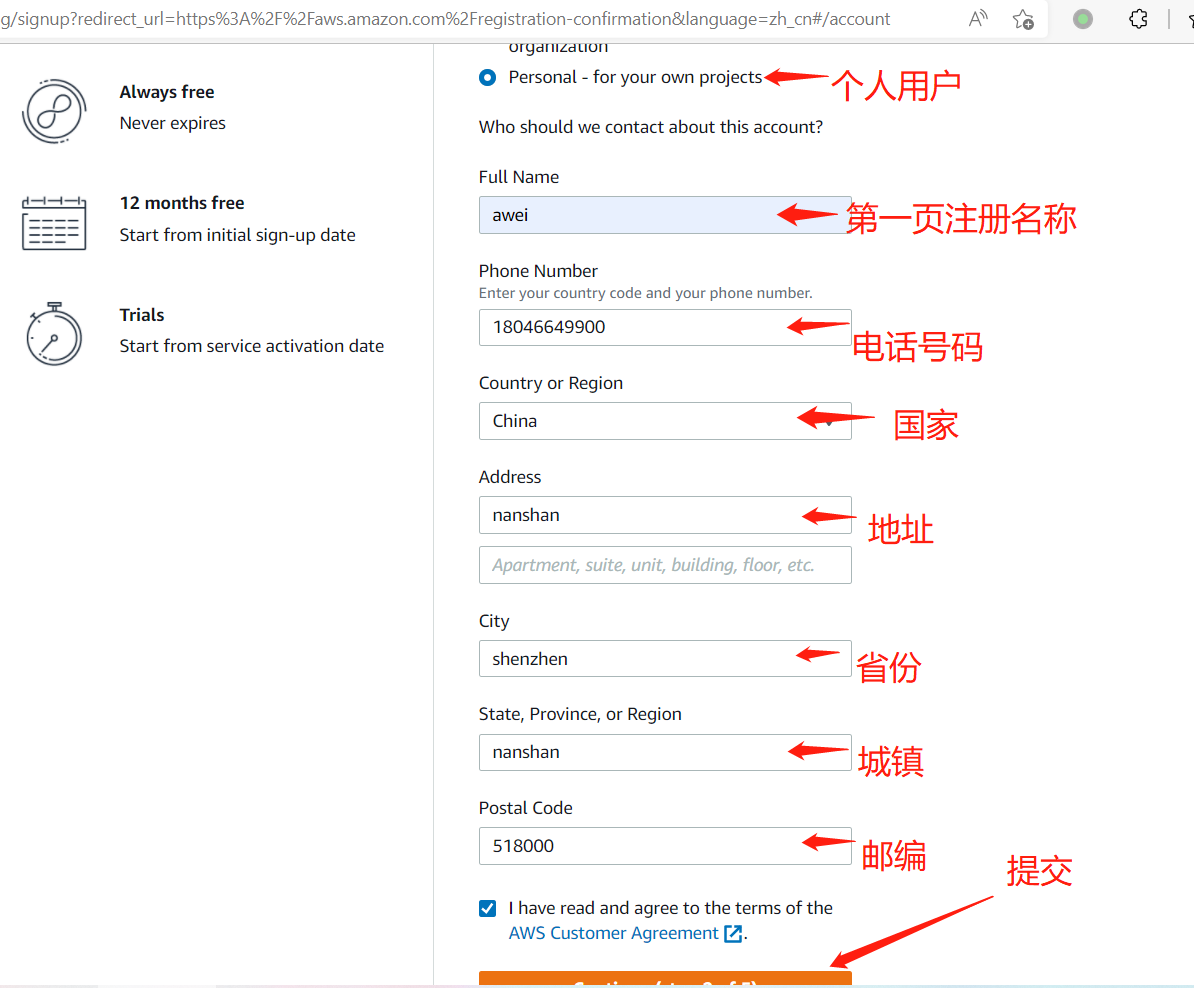
4Personal information: business users and individual users choose according to their own situation. Their full name is the same as the registered user name on the first page, and their telephone number and address are filled in according to the actual situation.
输入个人信息:商业用户和个人用户根据自身情况选择,用户名和第一页注册用户名相同,电话和地址根据实际情况填写。
5Fee deduction information: AWS deducts fees through credit cards to ensure the normal use of bank cards Verify and Contimue
扣费信息:AWS通过信用卡扣费,确保卡片正常使用(亚马逊是全球最大的云服务商,不会乱扣放心填写)Verify and Contimue

6Get the phone or SMS verification code information and fill in the four digit verification code
获取手机短信验证码信息,填入四位验证码
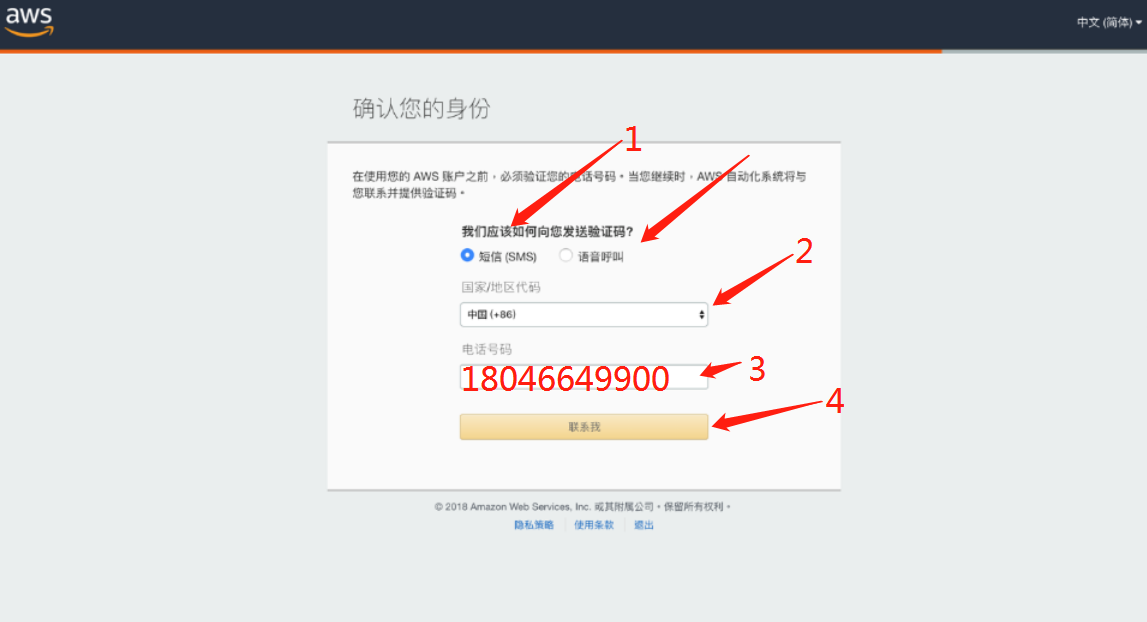
7 Select SMS verification code, or after receiving the verification code, enter the registration page to complete the final registration.
选择短信验证码,或电话接听收到验证码后,输入注册网页完成最后注册。

8 Finally, choose an AWS support plan. If you don’t need a paid support plan for the time being, please choose (1) free basic scheme.
最后,选择一种 AWS Support 计划,如果您暂不需要付费支持计划,请选择 (1)免费的基本方案。

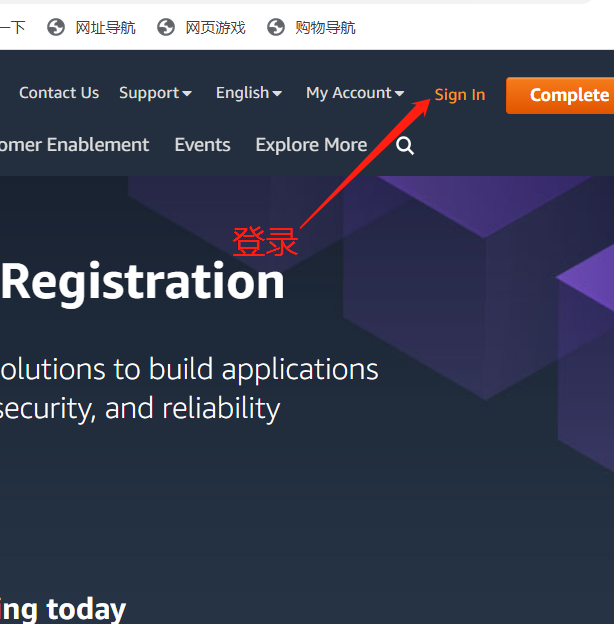
9Successful registration will receive an email with confirmation within a few minutes. You can log in https://aws.amazon.com Using Amazon cloud services
注册成功电子邮件将在几分钟内收到一封包含确认信息的电子邮件。 您可以登录https://aws.amazon.com使用 Amazon 云服务
注:Thinkium is a completely decentralized public chain network. In order to save the network traffic cost of all miners, community miners used the VPC network function of AWS Oregon cloud server in the early stage to save 80% of the traffic cost. When the number of thinkium nodes reaches 1000, any computer and network can participate in the node work.
Thinkium 是完全去中心化的公链网络,为了节约全体矿工的网络流量费用,前期社区矿工使用AWS美国俄勒冈州云服务器的VPC网络功能 节约80%流量开支,当Thinkium节点数达到1000台后,任意电脑和网络都可参与节点工作。
二.Amazon VPC network settings AWS VPC网络设置
Amazon VPC is the network layer of Amazon EC2. It has the advantage of scalability. It can use Amazon’s internal traffic resources at low cost and reduce traffic expenses by 80% Amazon VPC 是 Amazon EC2 的网络层,具有可扩优势,并且可以低成本使用亚马逊内部流量资源,降低80%流量开支
二1.Create VPC (创建VPC)
1.1 https://aws.amazon.com Log in to Amazon account and set the area as the target area in the upper right corner of the page (be sure to use: Oregon)
https://aws.amazon.com登录亚马逊账号,登录成功后页面右上角把区域设置为目标区域(一定要用:俄勒冈州)
Login succeeded after entering the verification code and password 输入验证码和密码后登录成功

1.2Enter VPC in the search box at the top of the page, and click VPC in the search results to enter the VPC setting page.
页面顶端搜索框输入 VPC,在搜索结果中点击VPC进入VPC设置页面。


1.3 Click VPCs to enter your VPC page on the right (delete the original default VPC first, copy the original Italic to delete the default VPC, and paste a few words into the box to delete it). After the deletion is successful, click Create VPC.
点击VPCs进入右侧您的VPC页面,(先删除原有的默认VPC,需要复制原本斜体的删除默认VPC,几个字粘贴进去框框里才可以删除)删除成功后,点击4创建VPC。

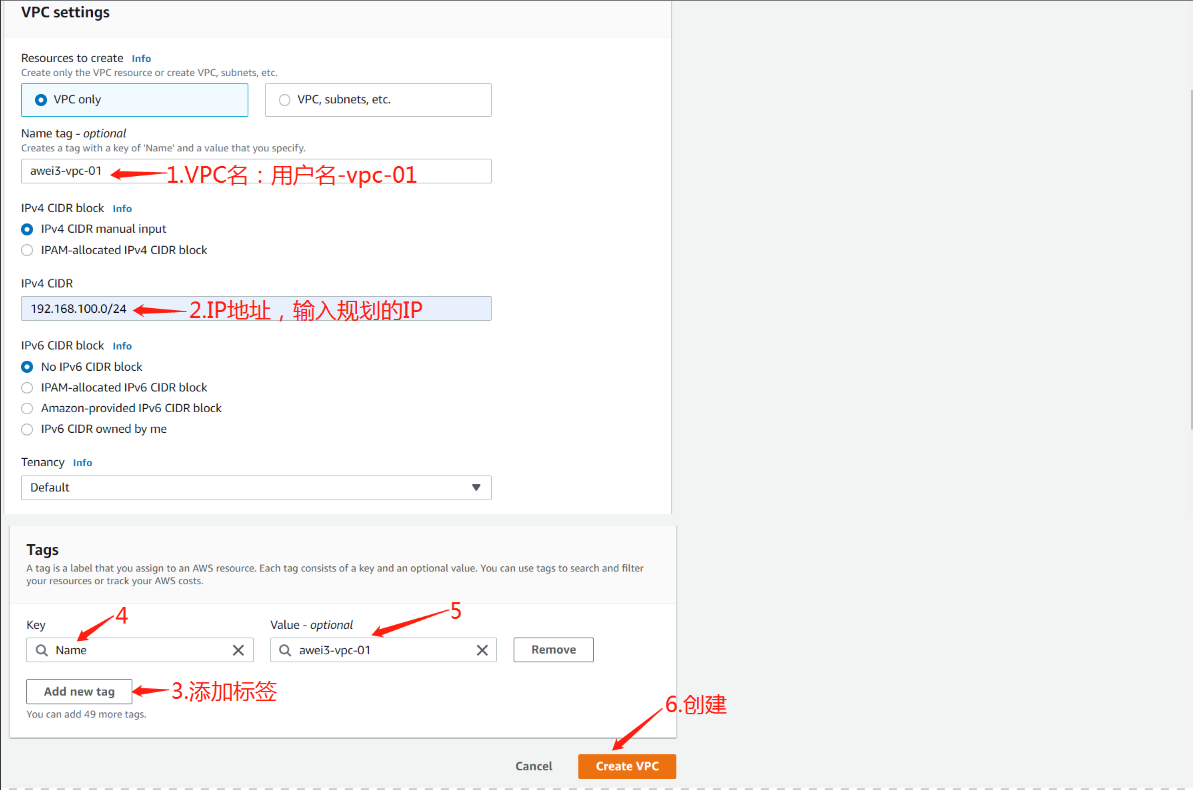
1.4Fill in the name label that can identify the VPC function (for example: capital letter abbreviation plus VPC plus 01, for example (Zhang San), i.e. zs-vpc-01)
填入可标识该VPC功能的名称标签(为:姓名大写字母简写加vpc加01,如(张三)即:ZS-vpc-01 )
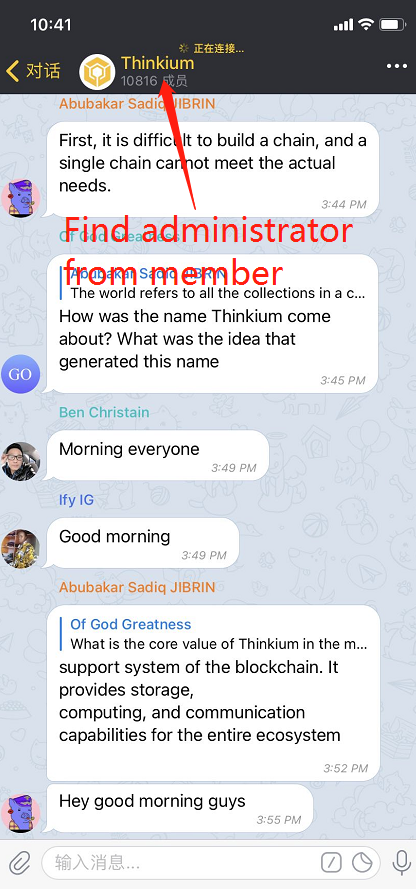
Ipv4cidr needs to enter the thinkium community and ask the administrator for the address (the IP addresses of each node cannot conflict. After setting the VPC, the community administrator needs to help establish the VPC peer-to-peer connection of each node)
IPv4CIDR需要进入Thinkium社区向管理员索取地址(各节点IP地址不能冲突,设置完VPC后需要社区管理员帮助建立各节点VPC对等连接)
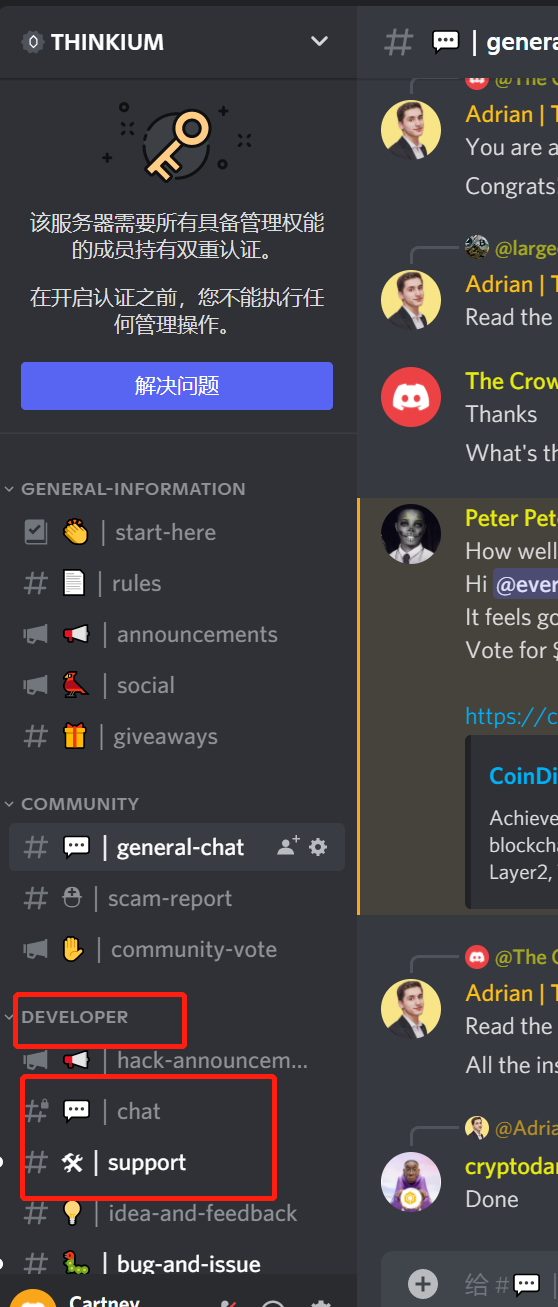
discord社区频道: https://discord.com/invite/ebpEVTznjN Telegram电报:https://t.me/Thinkiumofficial 中文社区微信:liuwen-xi
IPv4 CIDR 块填入路由信息,示例:172.33.0.0/16或168.6.0/24(由社区管理员提供)
2.After the VPC is created, click the subnet on the left and click Create subnet
VPC创建完成后点击左侧子网,点击创建子网

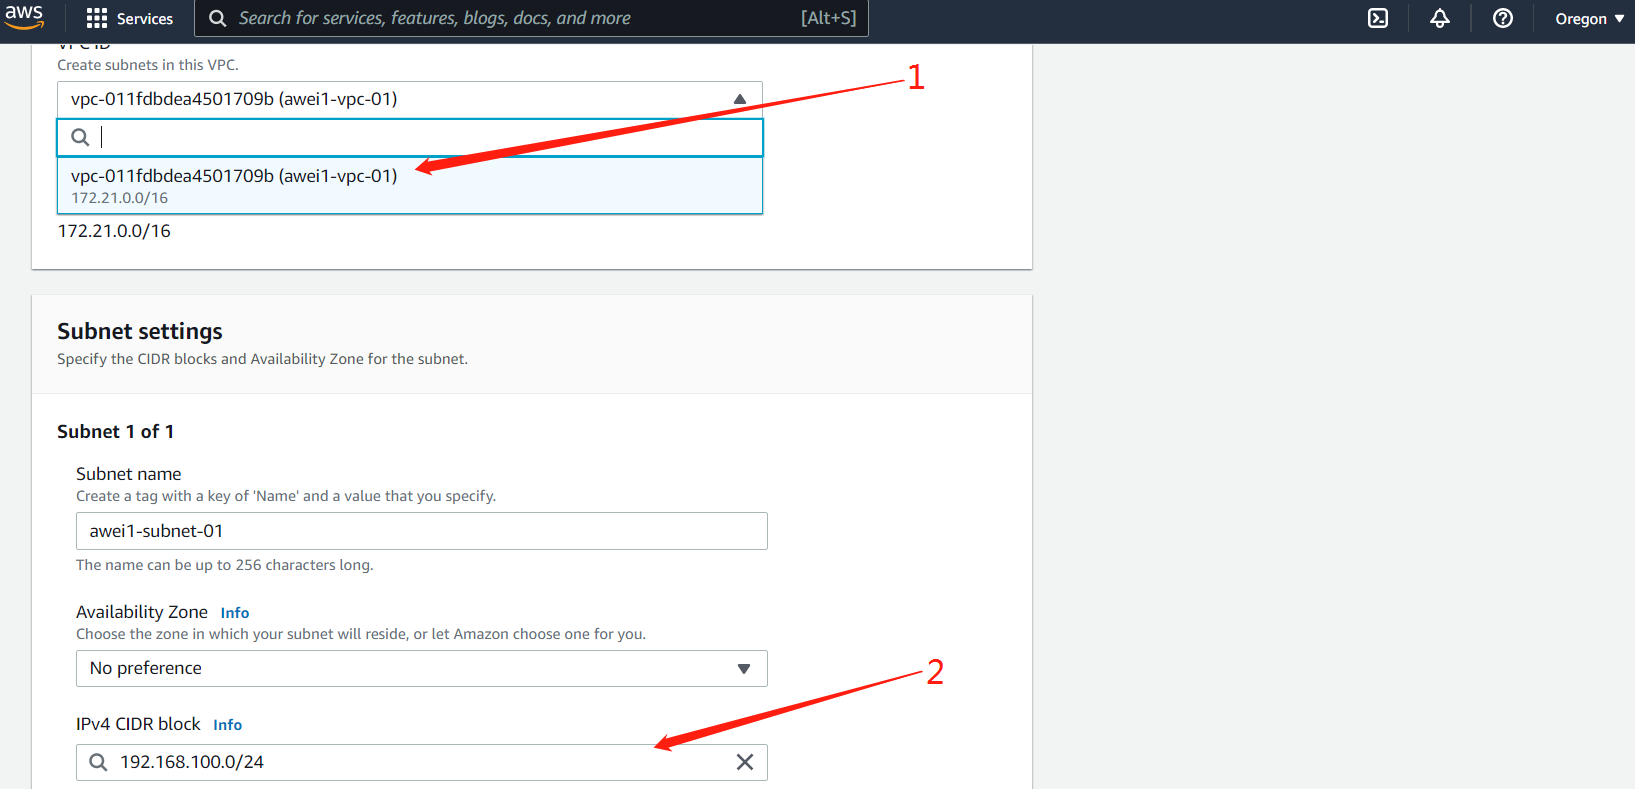
2.1 In the create sub web page, select the VPC just created by vpcid 在创建子网页面中VPCID 选择刚创建的VPC
2.2 Select the appropriate subnet name (i.e. name capital letter abbreviation plus subnet plus 01, e.g. (zhang san), namely ZS-subnet-01)
选择合适的子网名称(为:姓名大写字母简写加subnet加01,如(张三)即:ZS-subnet-01 )
2.3 Fill in the appropriate IPv4 CIDR, such as 192.168.100.0/24 (consistent with your VPC)
填写合适的IPv4 CIDR,如:192.168.100.0/24(和您的VPC一致)
2.4 Click Create subnet 点击创建子网

3. After the subnet is created, click the Internet gateway on the left and click create Internet gateway
子网创建完成后点击左侧互联网网关 , 点击创建互联网网关

3.1Fill in the appropriate name label in the page of creating internet gateway (for example: capital letters and abbreviations of the name plus Internet gateway, e.g. (Zhang San), namely: ZS Internet Gateway) Create Inetrnet gateway
在创建互联网网关页面中填写合适的名称标签(为:姓名大写字母简写加Internet-gateway,如(张三)即:ZS-Internet-gateway )点 Create Inetrnet gateway 完成。

3.2 After creation, you will automatically return to the Internet Gateway details page and click the top to attach to VPC
创建完成后回自动回到该互联网网关详情页面,点击上方附加到VPC
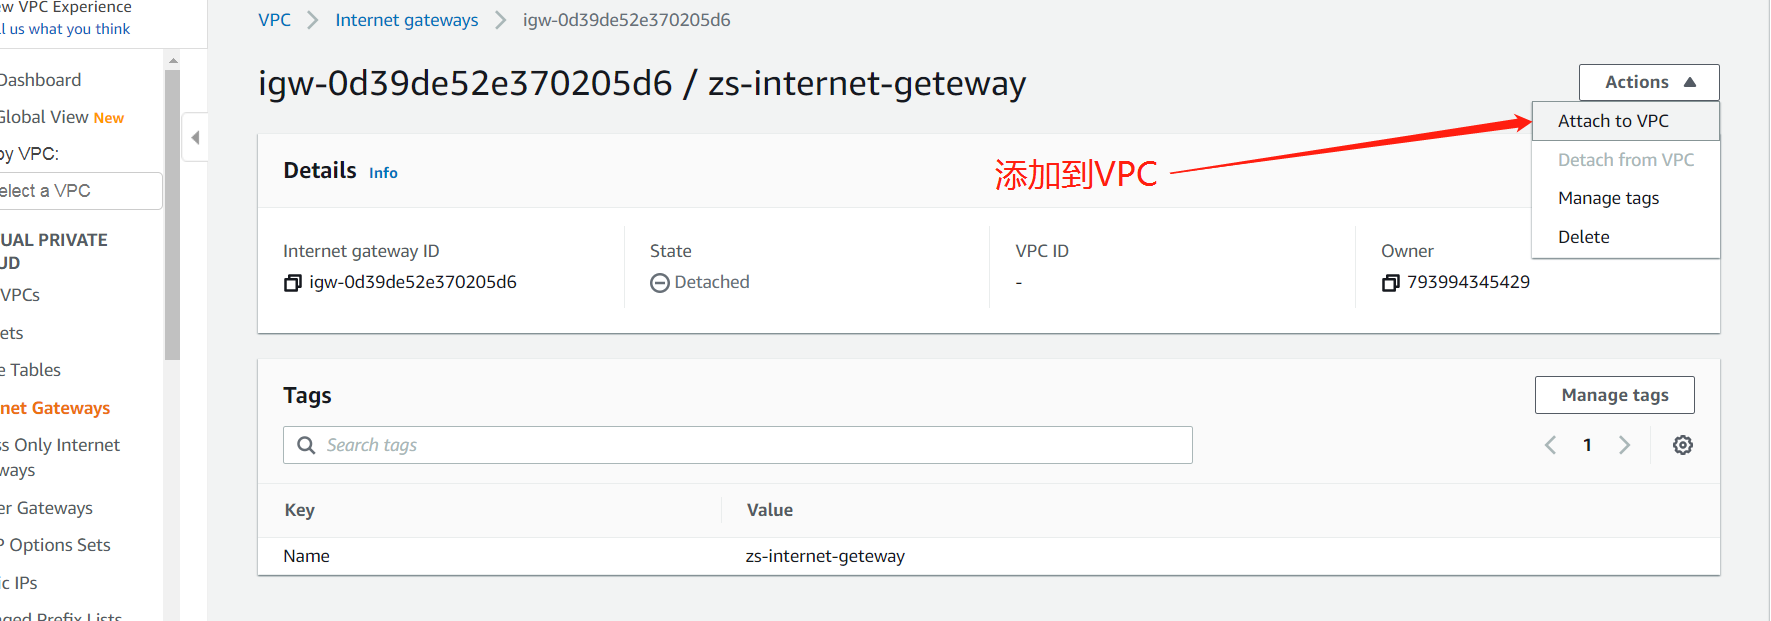
3.3 Select the newly created VPC on the additional page and click Attach Internet gateway 选择刚创建的VPC,点击连接互联网网关Attch internet gateway

4Routing table, create a new routing table 路由表,新建新的路由表ZY-route-table-01
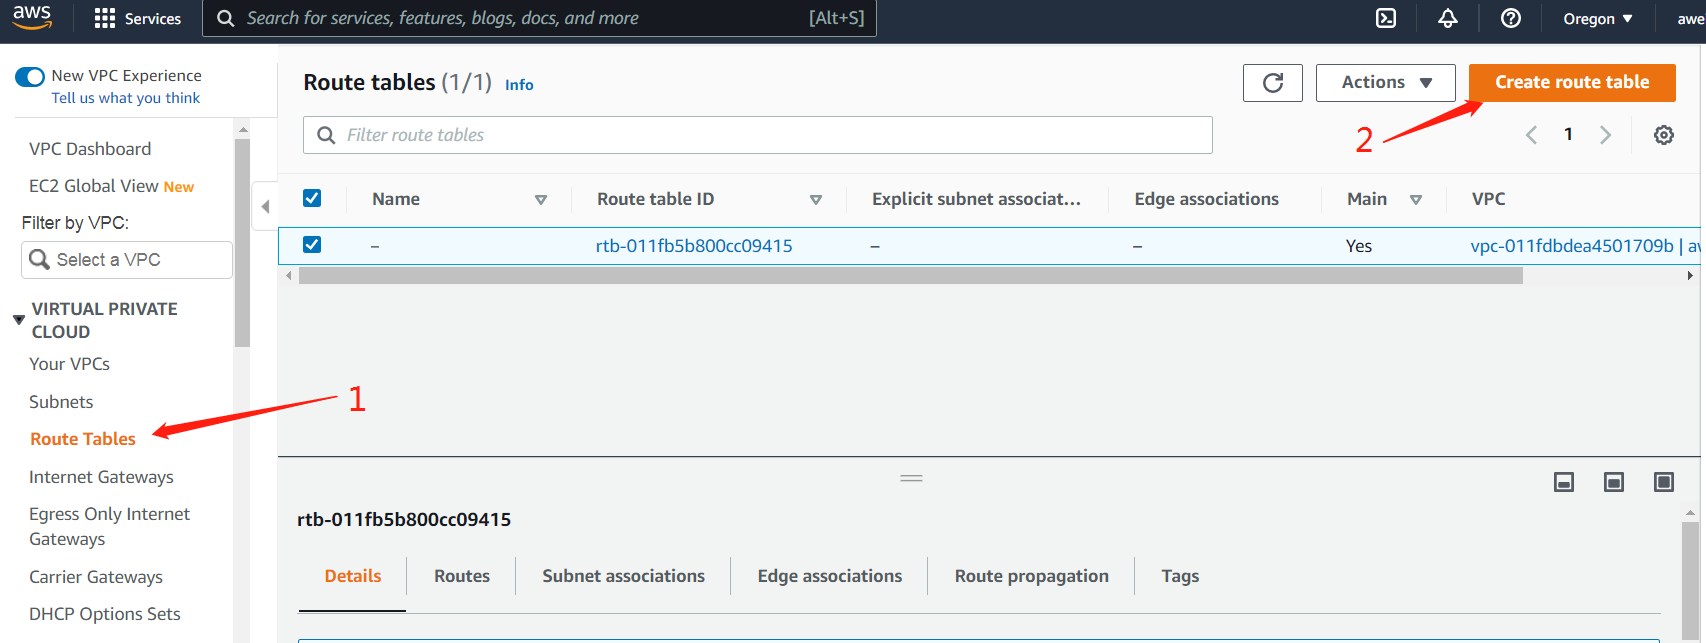
4.1Click the routing table on the left, create and enter the name, and select the routing table that just created the VPC association to complete the creation
点击左侧路由表,创建输入名称,中选中刚创建vpc关联的路由表 完成创建

4.2 1. Click Add route in the pop-up page. 2. Add Internet gateway route (0.0.0) in the routing table. 3. Select the Internet gateway as the target, and then select the pop-up Internet Gateway attached to this VPC (generally marked with gateway name)4 SAVE
1在弹出的页面中点击添加路由 2在路由表中添加互联网网关路由(0.0.0) 3目标选择Internet Gateway,然后选择弹出的附加到本VPC的互联网网关(一般都标有网关名称)4 保存


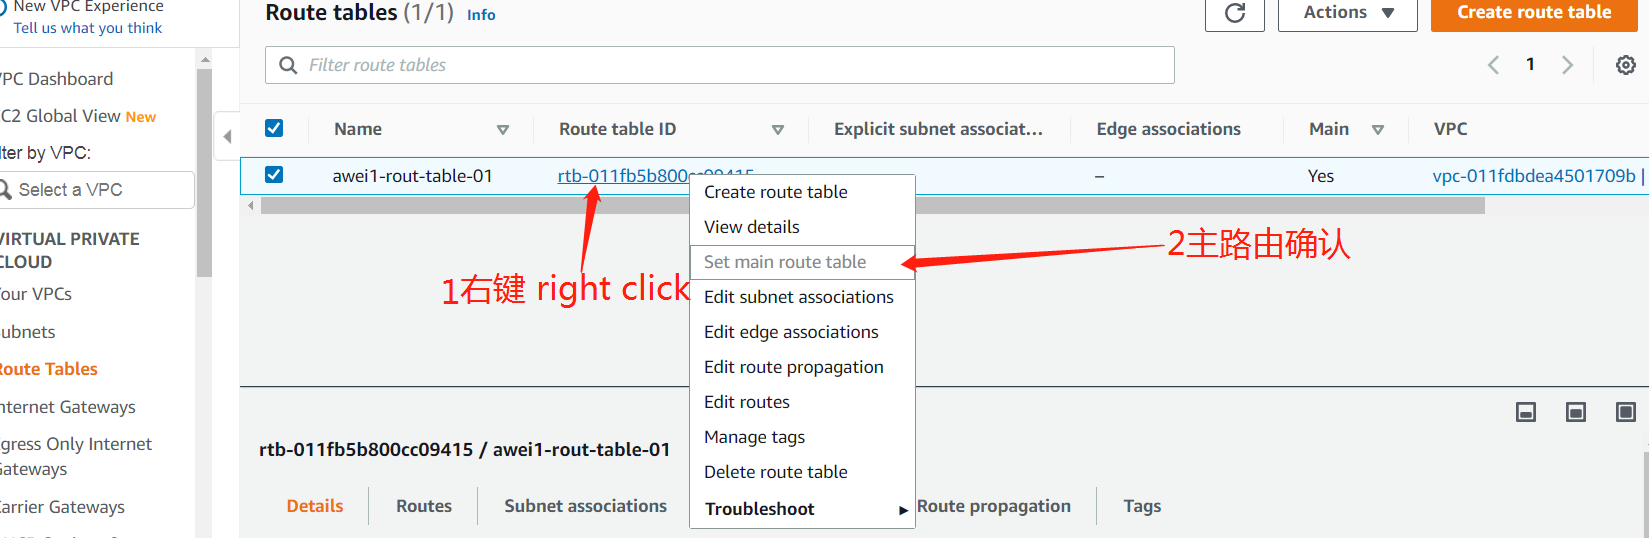
4.3 Set the newly created route as the main route (note that the main route can be set only after the Internet gateway route is added): select the newly created route table → right click → copy the setting in the red box and fill in the underground square → click the lower right corner to confirm.
将新创建的路由设置为主路由(注意一定在互联网网关路由添加后才可设置主路由)步骤:选中新创建的路由表→点击右键→复制红框里的设置两字填到地下方格→点击右下角确认。

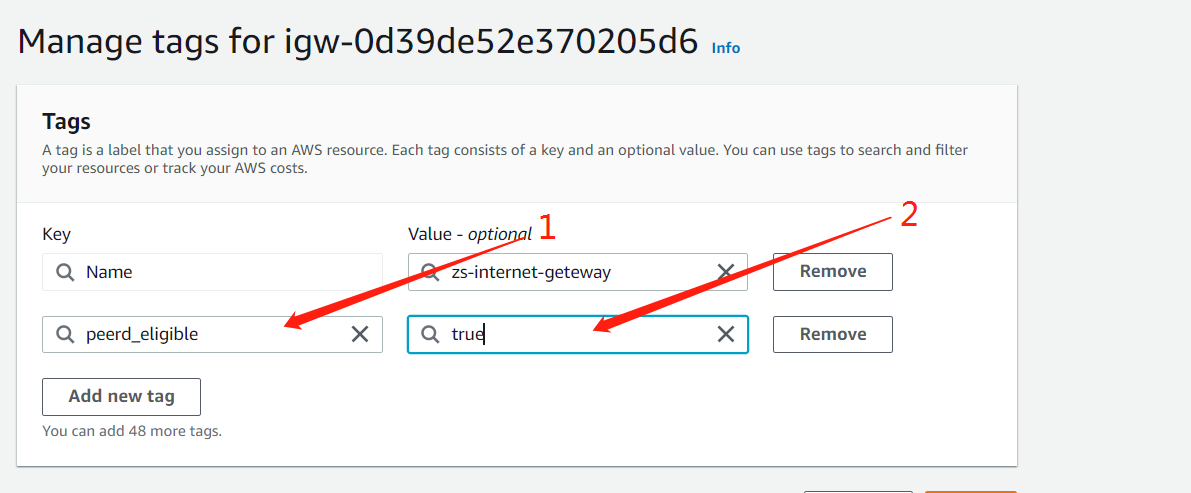
5 Add fixed label peerd to VPC, Internet gateway and routing table res
Key: peerd_ eligible Value: true 。
给VPC、互联网网关、路由表分别添加固定标签 键:peerd_eligible 值:true 。

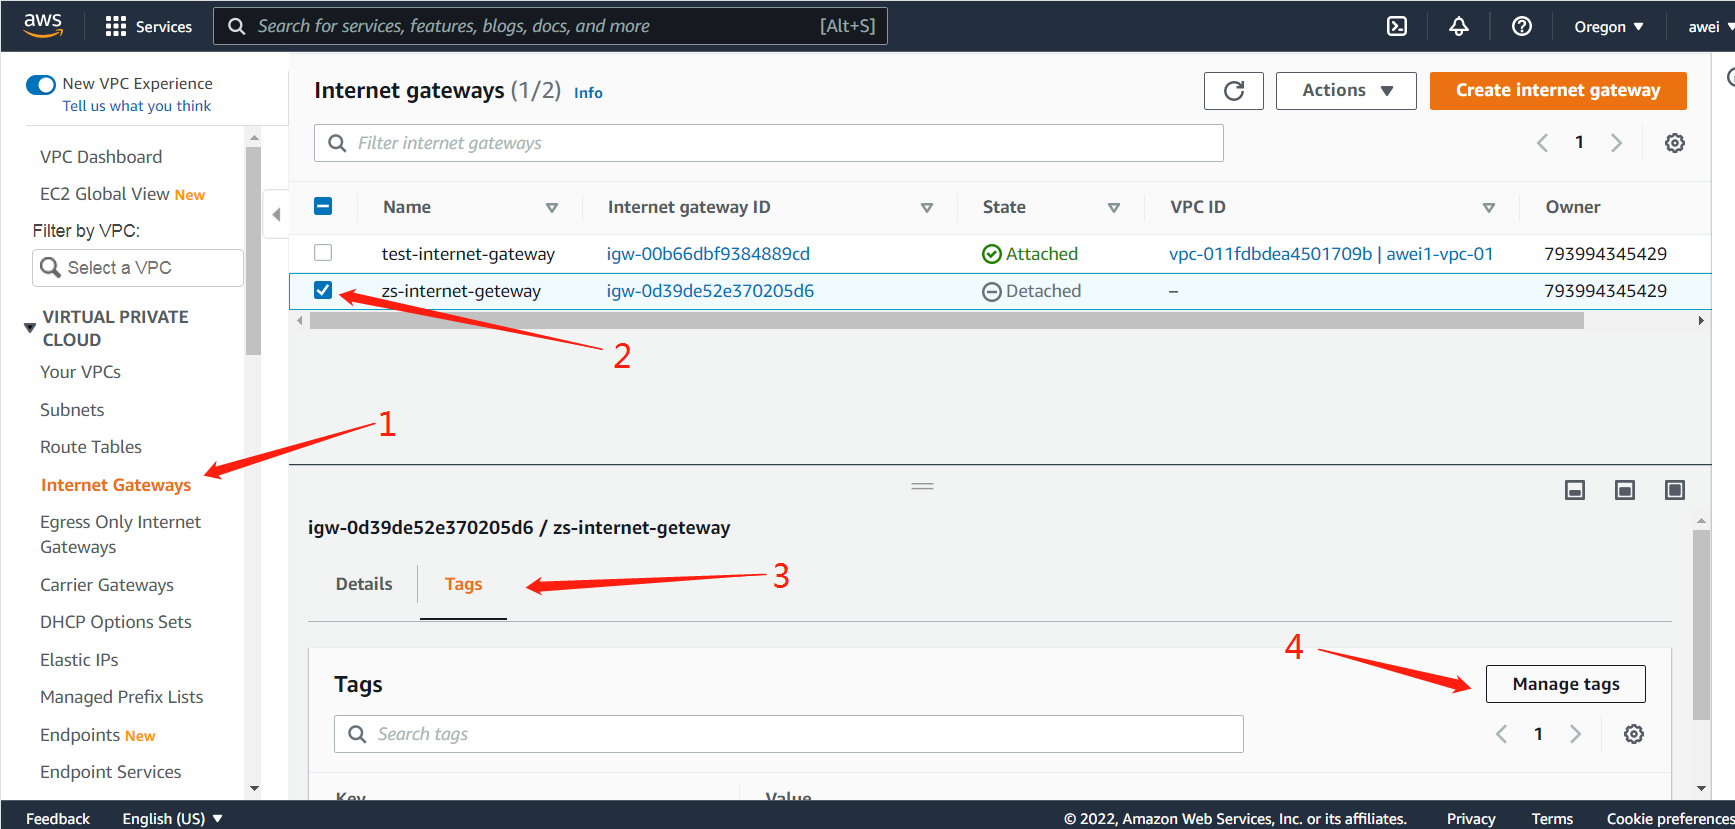
5.1 Fill in the appropriate name label in the create Internet Gateway page (select the Internet gateway → right click to select the management label / click the label below → add a new label, enter peerd_eligible true → save)
在创建互联网网关页面中填写合适的名称标签(选中互联网网关→点击右键选管理标签/点击下方标签→添加新标签,输入peerd_eligible true →保存)
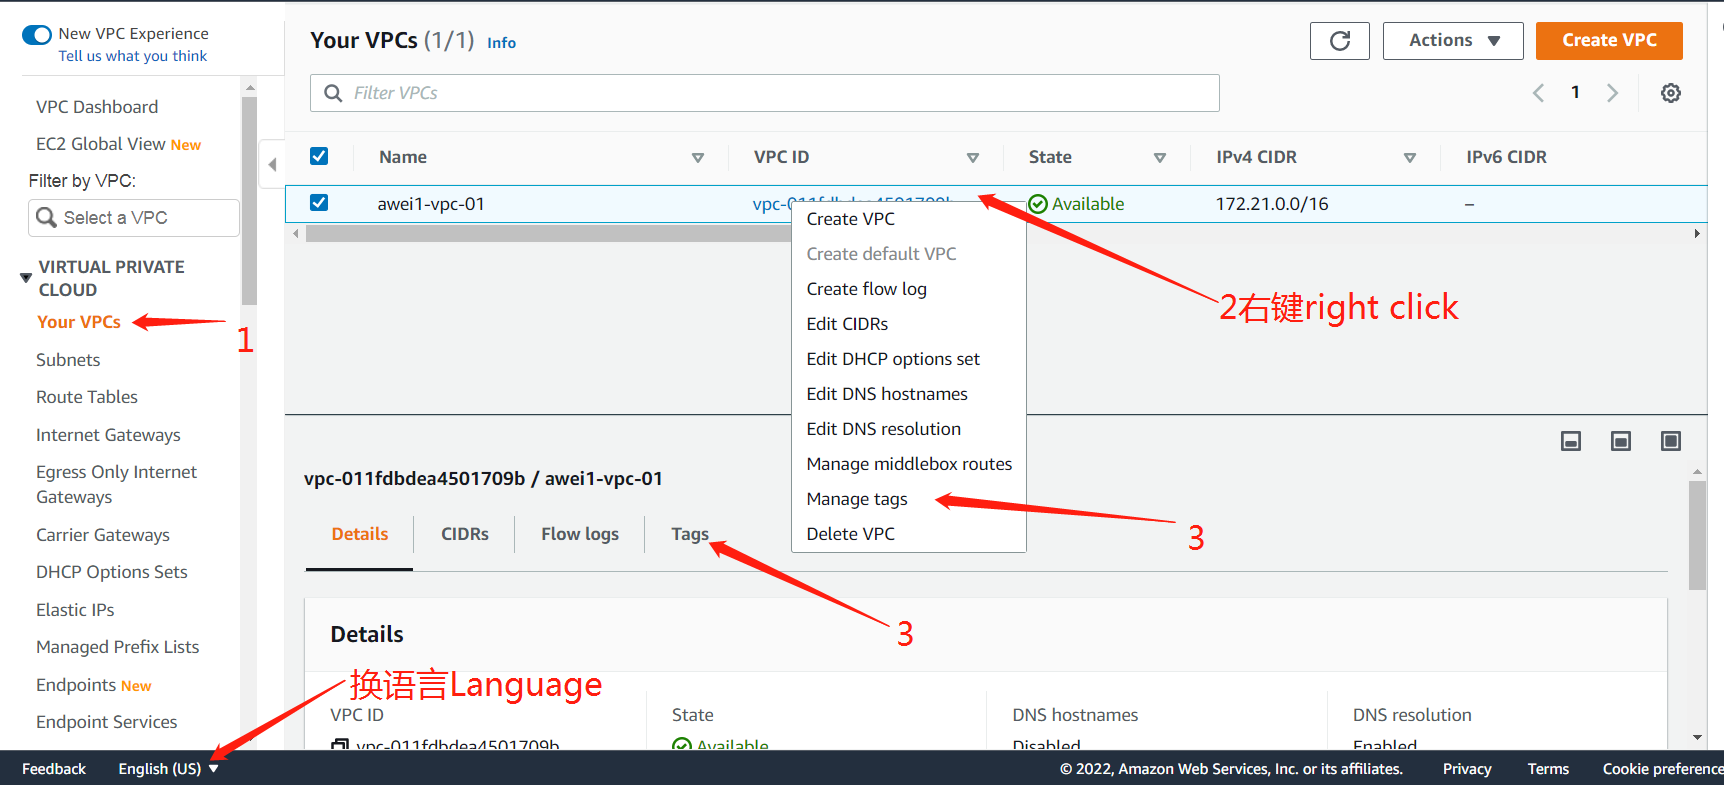
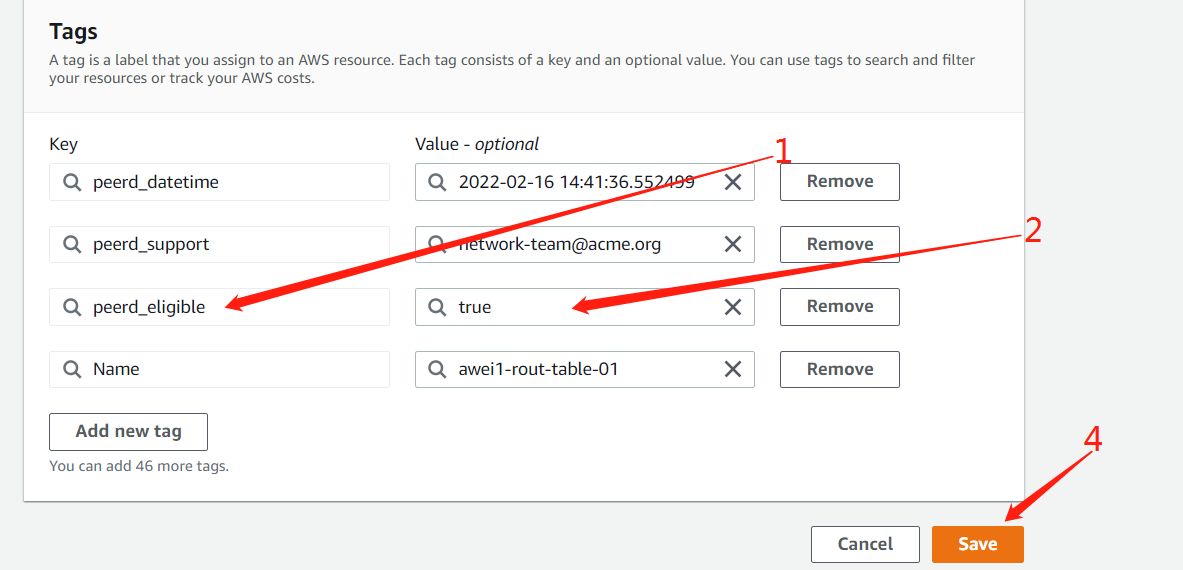
5.2 Create a label for the newly created VPC associated routing table (select the newly created routing table → right click to select the management label / click the label below → add a new label, enter peerd_eligible true → save)
给刚创建的VPC关联的路由表创建标签(选中新创建的路由表→点击右键选管理标签/点击下方标签→添加新标签,输入peerd_eligible true →保存)

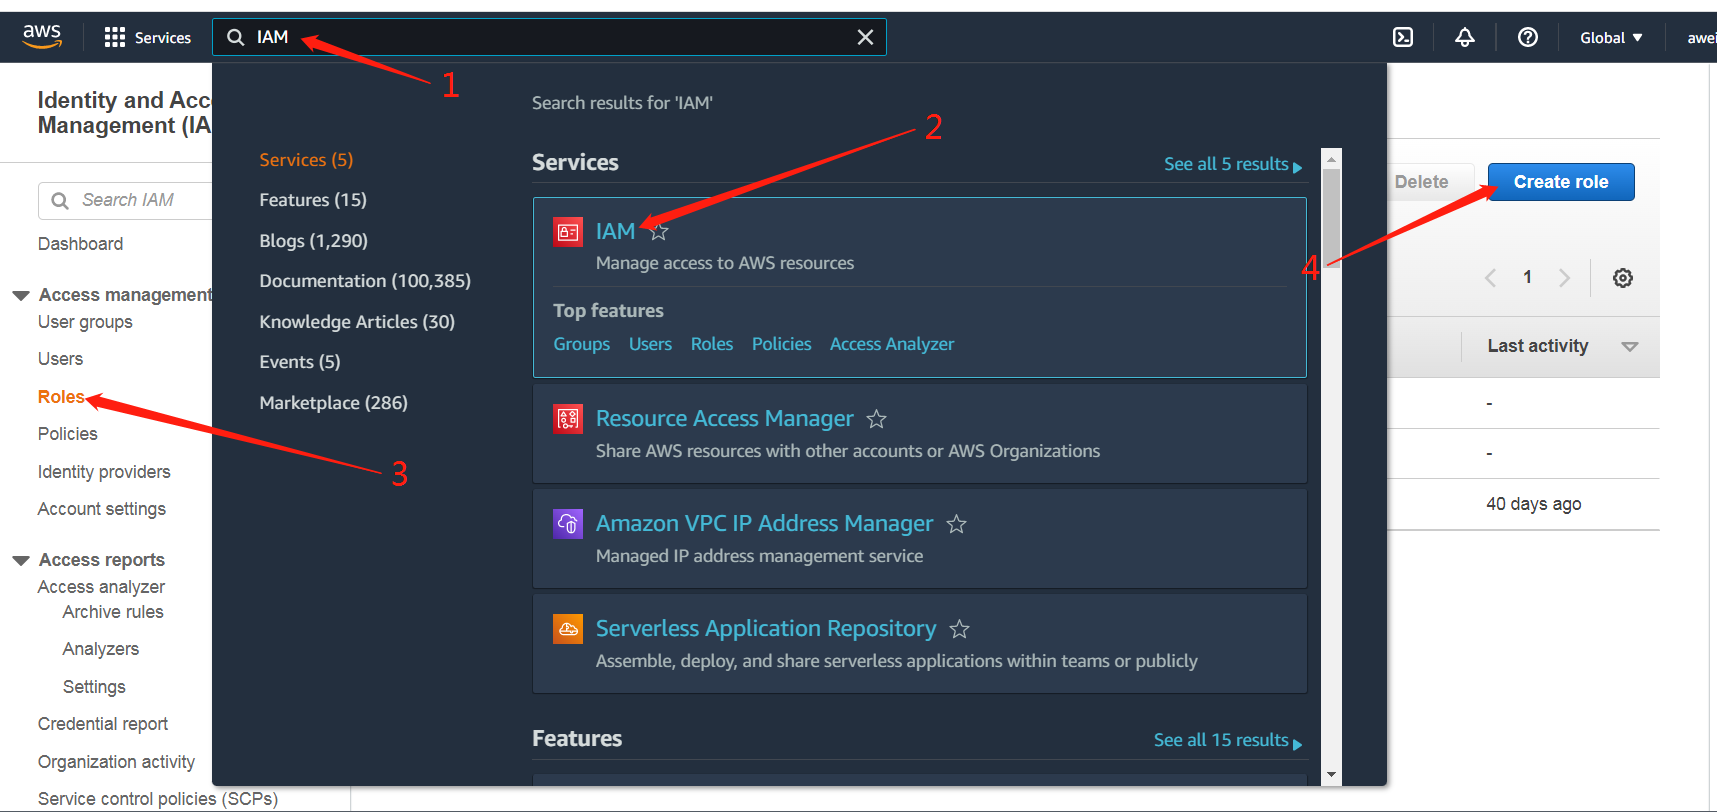
三Create Iam role 创建IAM角色
1.Search Iam in the top bar (dark) of the page and click to enter
在页面顶栏(深色)搜索IAM点击进入
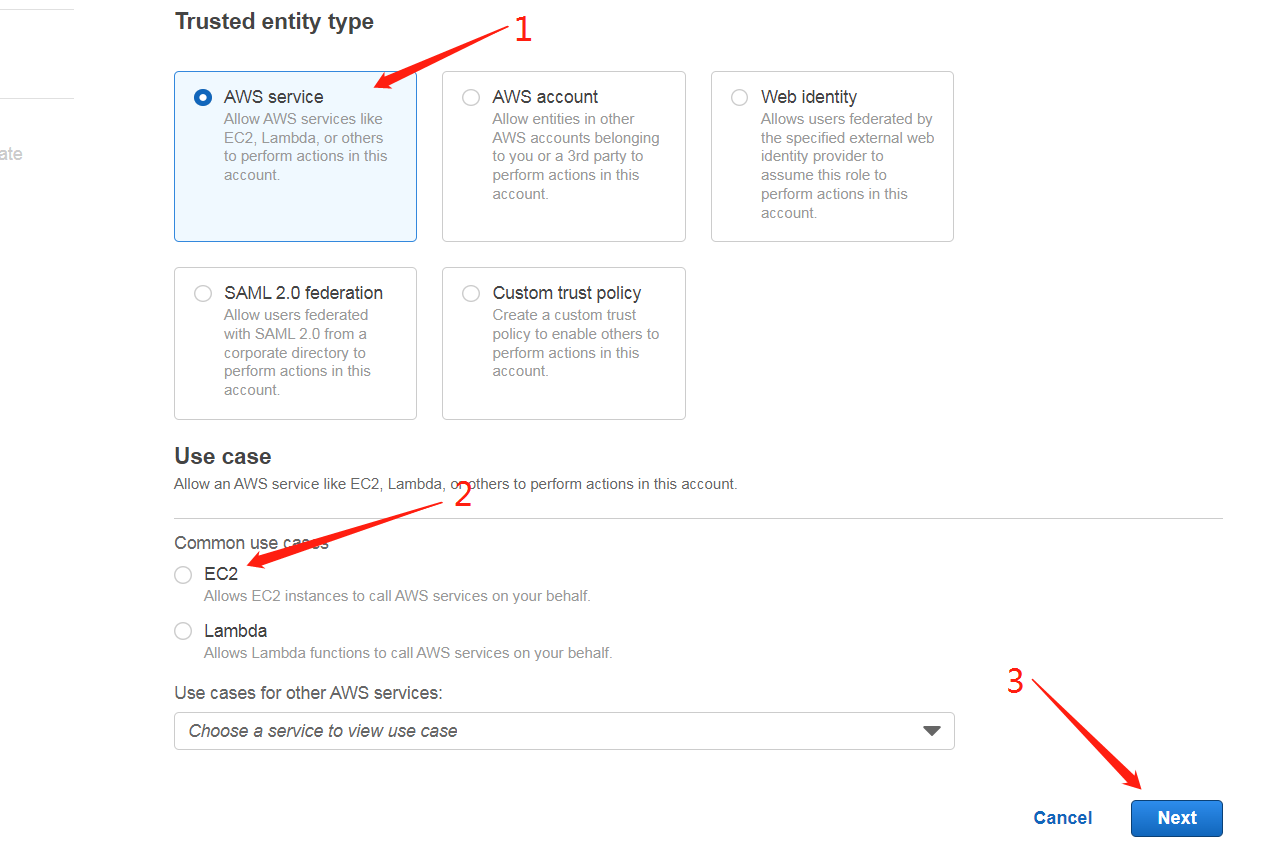
1.1 In the permission policy 1 input box: Amazon vpcfullaccess # or click the input box to select # Used ad- Used ad permissions policy # 2 policy name check Amazon vpcfullaccess # 3 next step
在权限策略 1输入框:AmazonVPCFullAccess 或点击输入框选择 作用—作用权限策略 2策略名称勾选 AmazonVPCFullAccess 3下一步
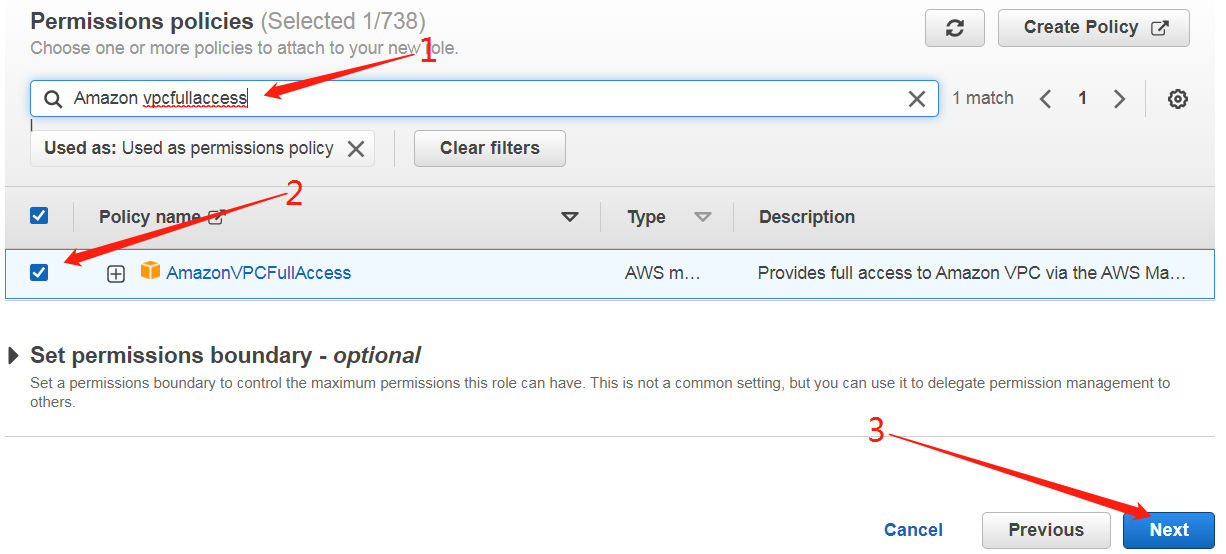
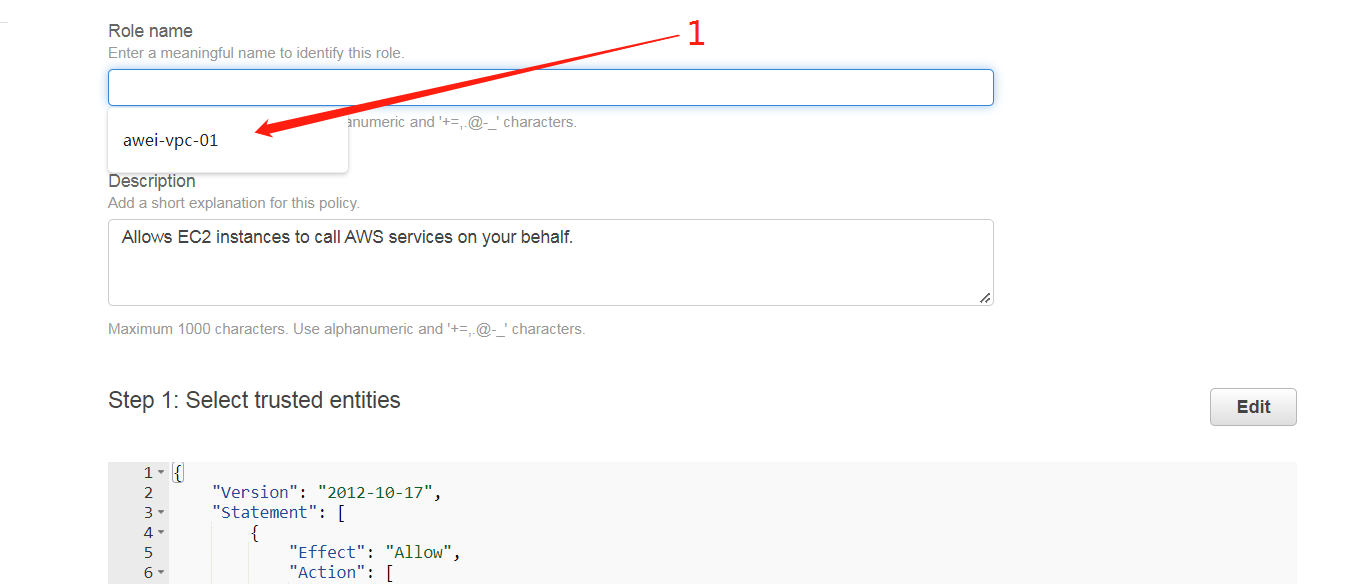
1.2 Next, select the Role name (which cannot be changed), and then create it directly 下一步选择角色名称(不可更改) 选完后直接创建

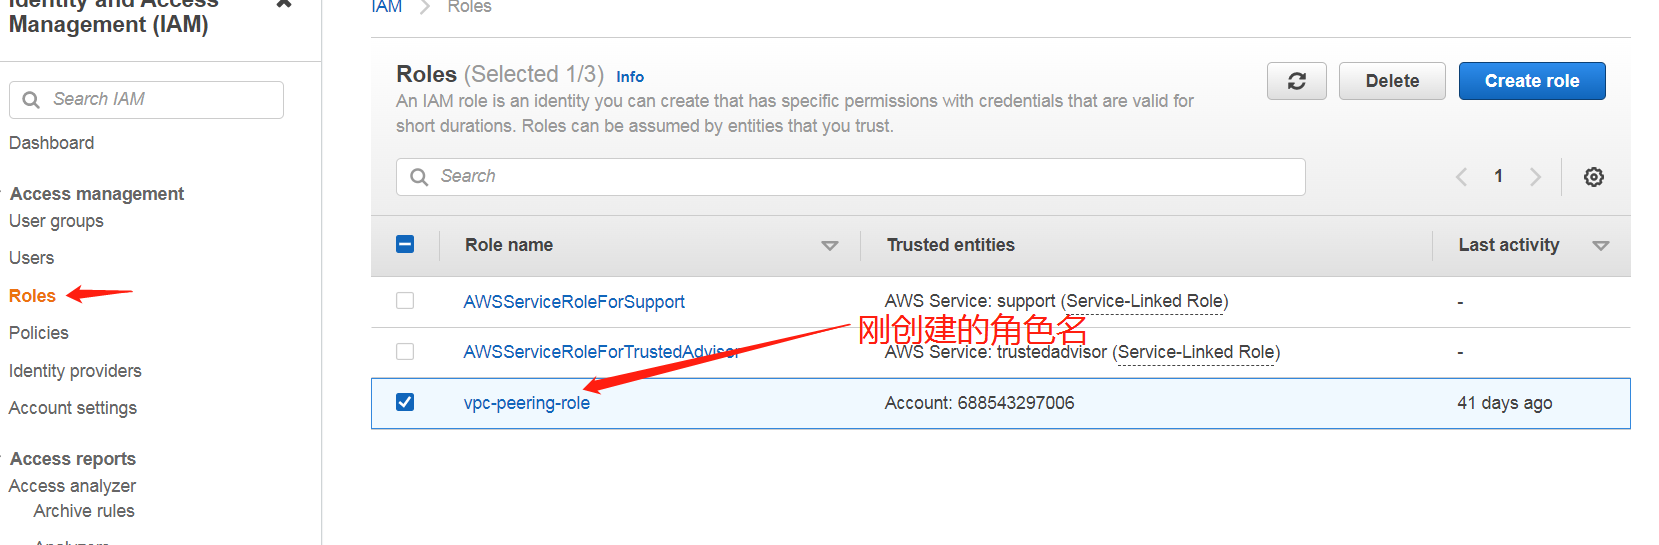
1.3 Select the newly created role name in the role list, click enter, and select the trust relationship to enter the update.
在角色列表 选择刚创建的角色名点击进入,选择信任关系进入更新。
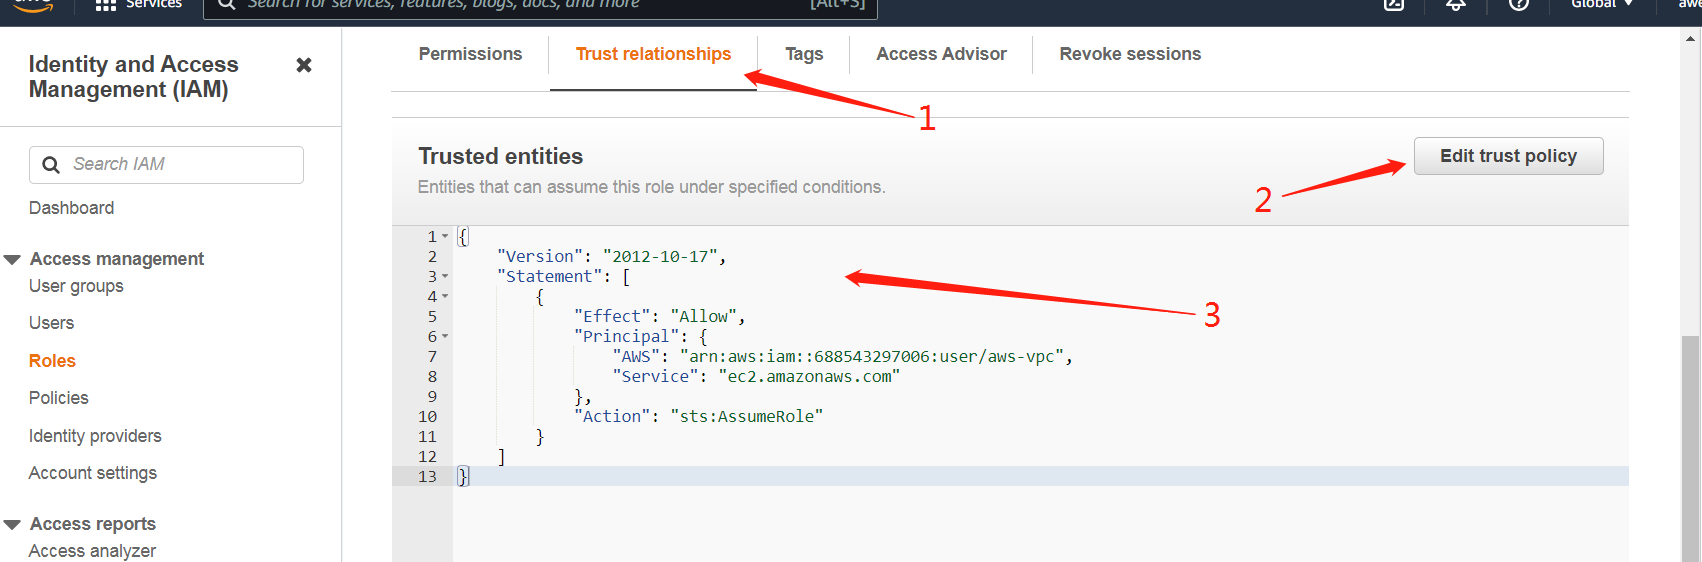
{
“Version”: “2012-10-17”,
“Statement”: [
{
“Effect”: “Allow”,
“Principal”: {
“AWS”: “arn:aws:iam::688543297006:user/aws-vpc”,
“Service”: “ec2.amazonaws.com”
},
“Action”: “sts:AssumeRole”
}
]
}


1.4 Copy the red envelope text above, replace the original script, and update the trust.复制上方红包文字,替换掉原脚本,更新信任完成。
四AWS Submit (work order)提交(工单)升级路由数量
It is necessary to increase the number of VPCs and routes, and submit the work order to AWS for background processing
需要提升VPC和路由的数量,提交工单由AWS后台处理
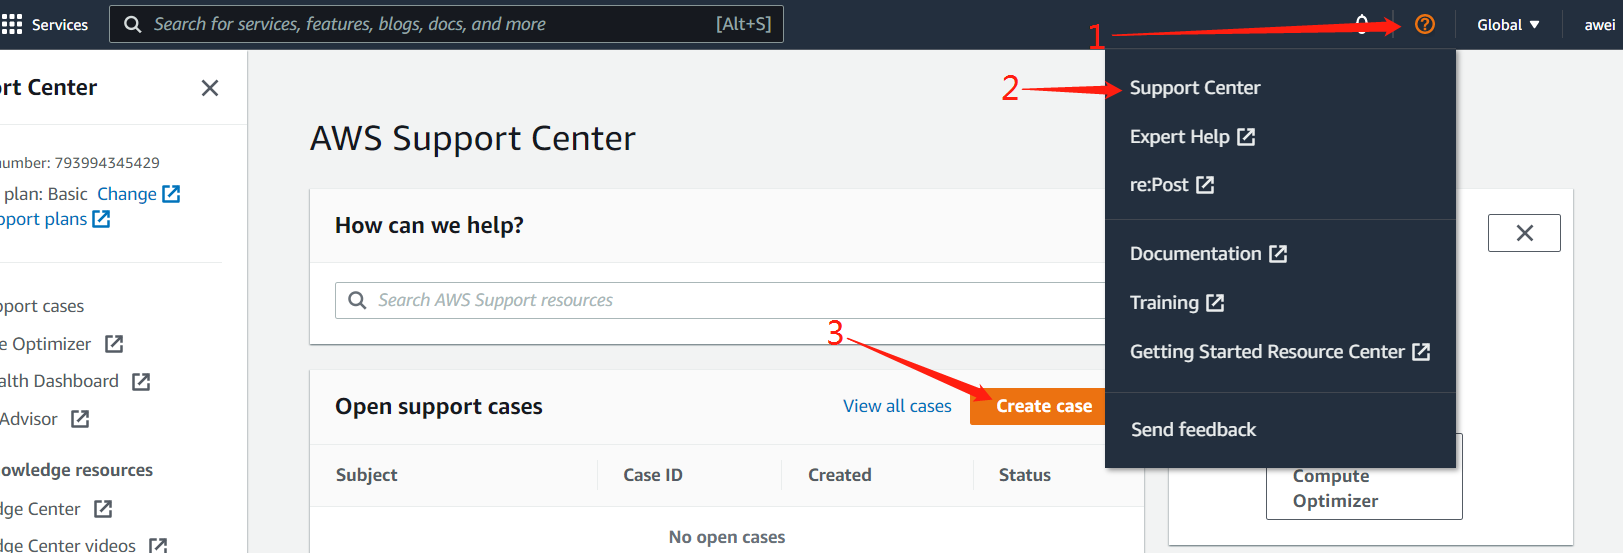
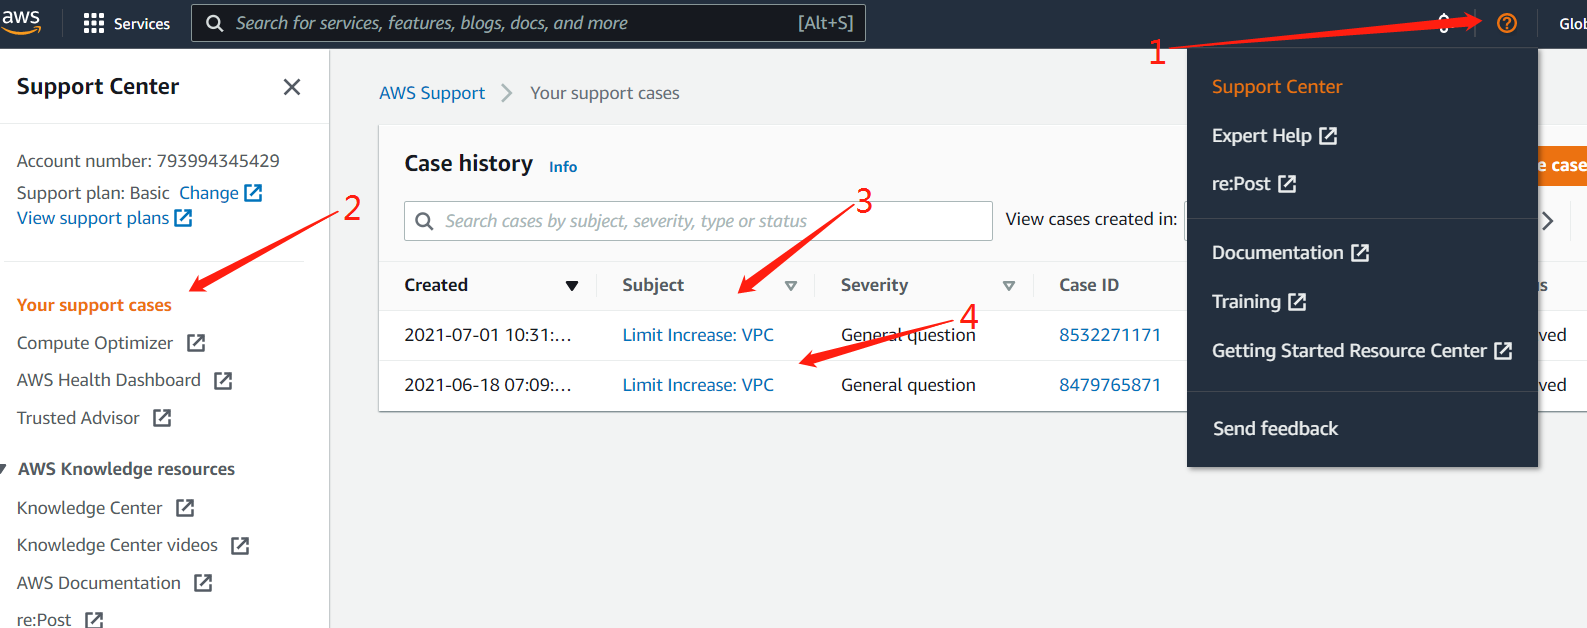
四.1 https://aws.amazon.com/ 登录控制台 右上角,支持—支中心—点击Create case

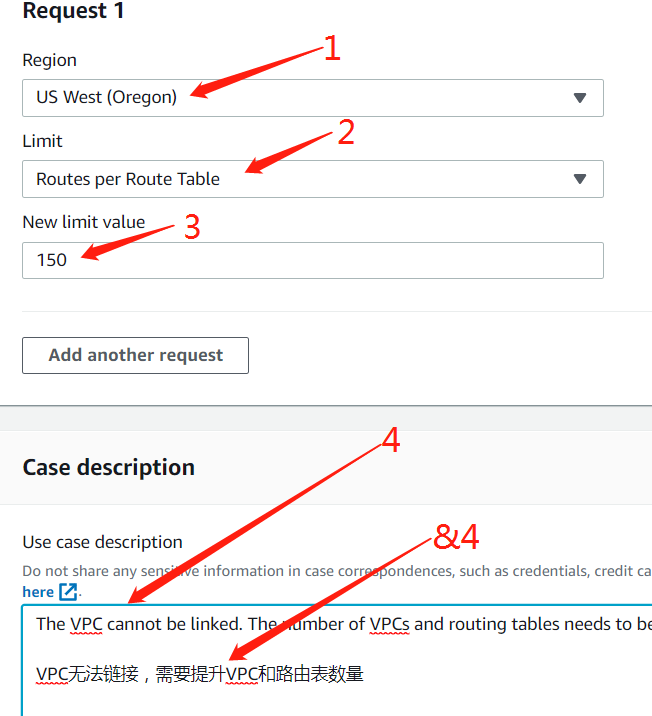
四.2 Submit two requests and select the contents respectively 提交两个(工单)request,内容分别选择
- US WEST (OREGON) ; Active VPC Peering Connections per VPC; New limit : 150
- US WEST (OREGON) ; Routes per Route Table ; New limit :150
问题描述: VPC无法链接,需要提升VPC和路由表数量

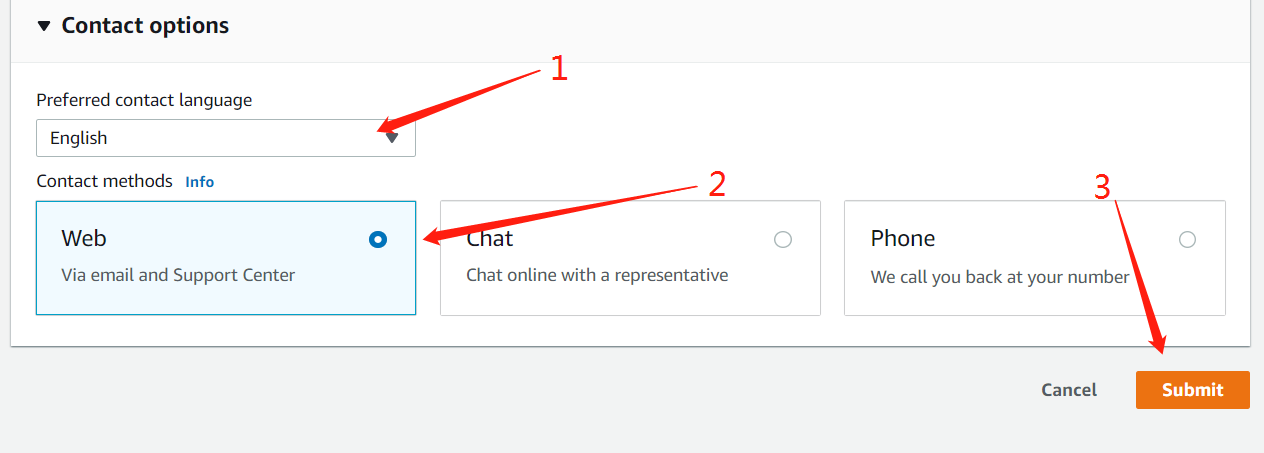
四.3Prompt that the submission is successful and wait for the staff to operate. 提示提交完成,等待工作人员操作。
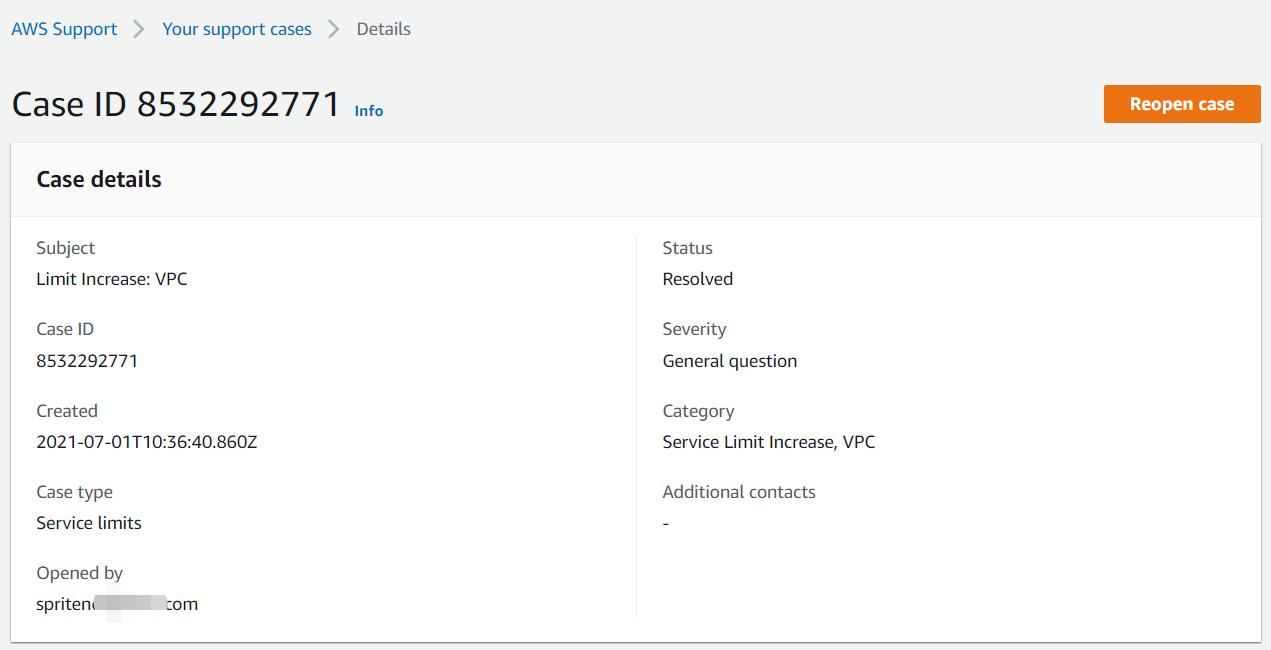
Check the work order progress after the manual operation is completed.人工操作完成后查看工单进度。
四.4 Postman Update VPC configuration 更新VPC配置
Open the software package downloaded in the first step, find postman setup, install postman-win64, look at the installation instructions, import the VPC configuration script file, modify the parameters and submit Send.
打开第一步下载的软件包,找到Postman-setup 安装Postman-win64 ,看安装说明,并导入VPC配置脚本文件,修改参数并Send提交。
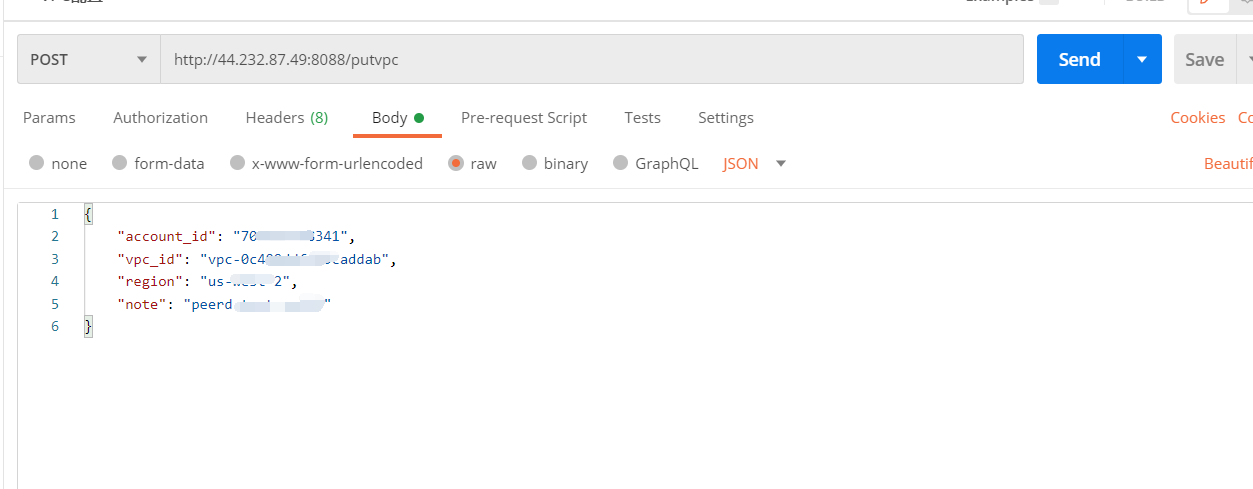
Modify the content and change the account_ id,vpc_ ID, region, note and other information with the VPC just set
修改内容,将其中的account_id,vpc_id,region,note等信息替换为刚设置的VPC

1、account_id:亚马逊账户id AWS accountID
2、vpc_id:刚才配置的VPC id
3、region:VPC位置,us-west-2代表俄勒冈,无需修改 No modification required
4、note:您的vpc备注 remarks
例如:peerd test vpczs(建议写为peerd test vpc+姓名首字母例如张三)(peerd test vpcawei03)
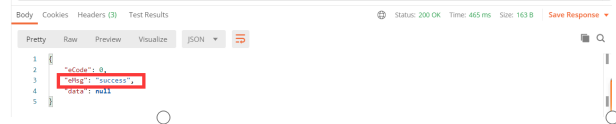
After the modification is completed, click (send), and then wait. The call result( success) will be returned
- 修改完成后,点击发送即可(Send),然后等待,会返回调用结果success
AWS accountID $vpcID Send to community administrator 发送给社区管理员。
五 Server purchase and configuration服务器购买与配置
After VPS configuration is completed, contact the community administrator to help establish peer-to-peer connection of each node, and then start to purchase the server
VPS配置完成,联系社区管理员帮助建立各节点对等连接完成后开始购买服务器。
- Configuration requirements配置要求
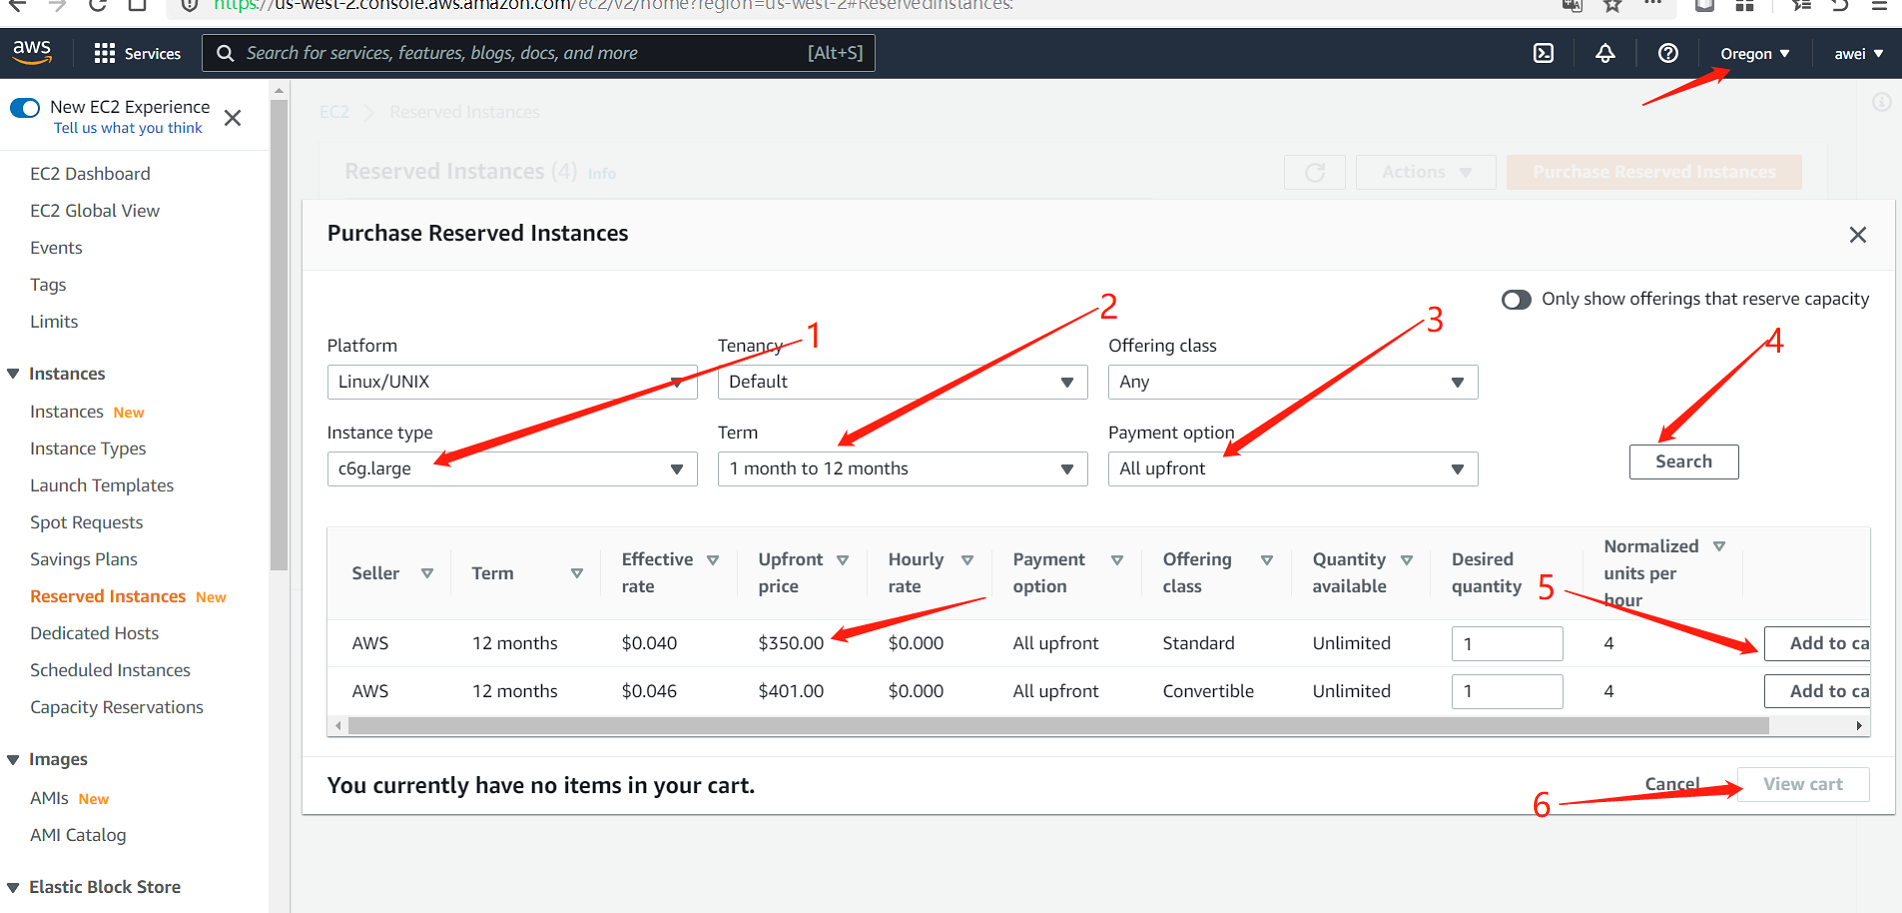
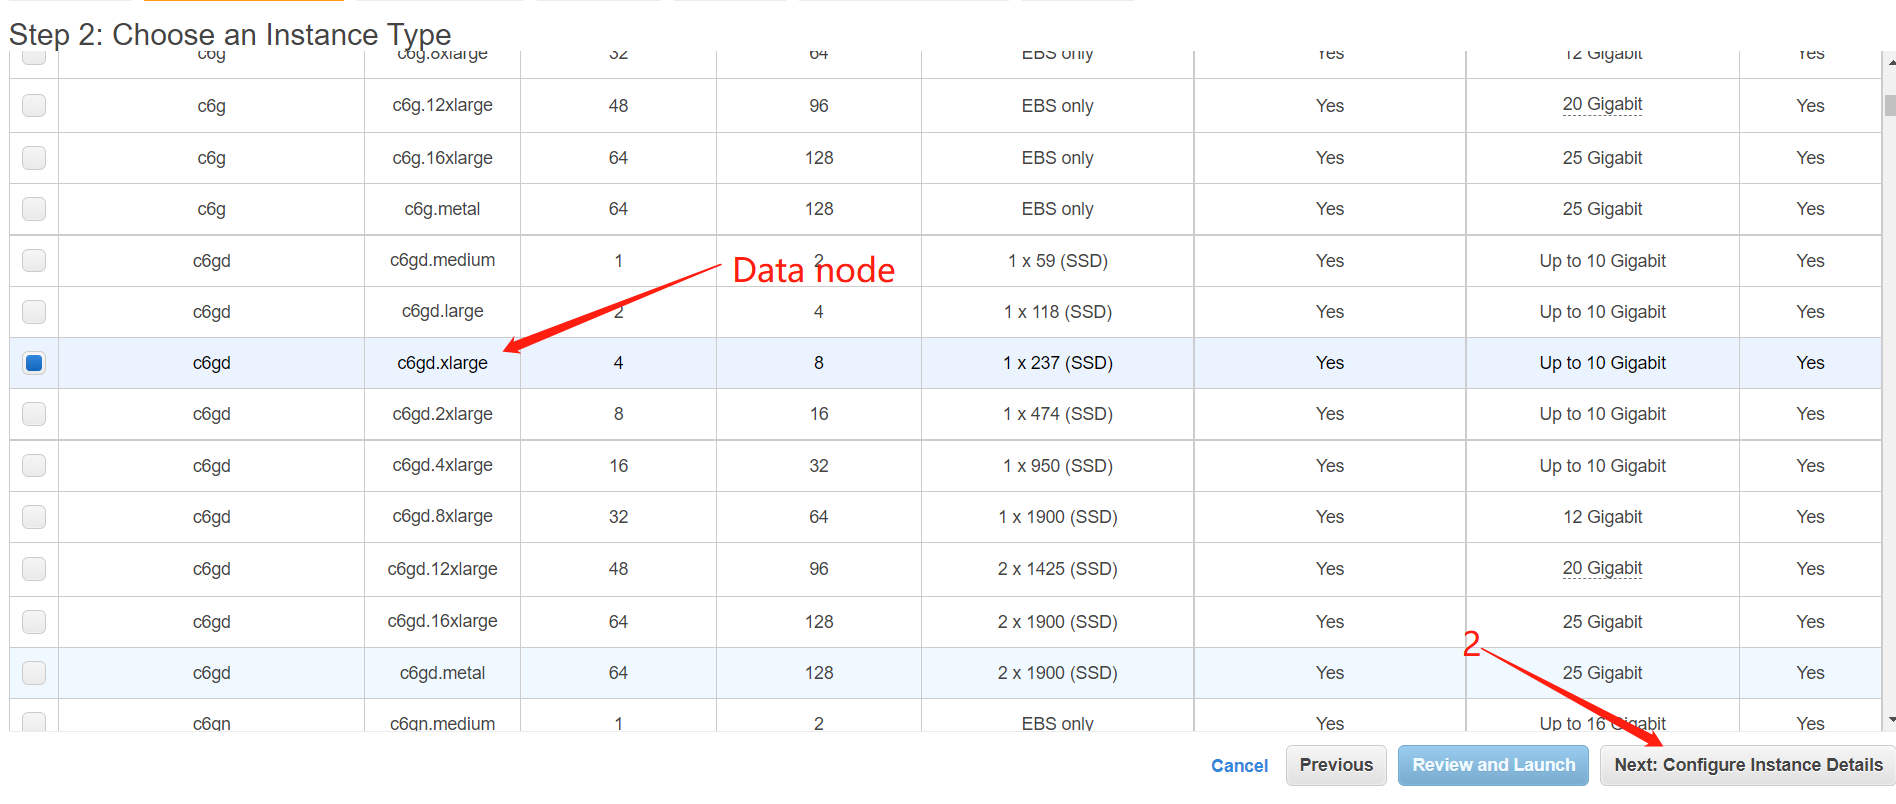
Consensus node (combined ore pool and independent ore pool) selection c6g Large (US $350), select c6g XLarge (US $892) in the Data node, select the period from January to December, select the payment option of prepaying all expenses, click search, click Add to shopping cart, and click View shopping cart after adding.
注:共识节点(联合矿池和独立矿池)选择c6g.large(350美金),数据节点选择c6g xlarge(892美金),期限选择1-12月,付款选项选择预付全部费用,点击搜索,点击添加到购物车,添加完成后点击查看购物车。
- 地区选择——必须选择俄勒冈 Regional choice -Oregon must be selected
- 服务器型号 C6G及以上 Server model c6g and above
- 共识节点(联合矿池和独立矿池)Consensus node:CPU: 2C 内存Memory:4GB以上 SSD存储storage:100G
- 数据节点Data node:CPU 4C 内存Memory8GB以上 SSD存储storage500G
- 流量 按实际使用付费(0.01~0.02美元/每G;流出流量收费,流注流量不收费),实际流出流量约在10G~20G左右
- The flow is paid according to the actual use (US $0.01 ~ 0.02 / g; the outflow flow is charged, and the injection flow is not charged). The actual outflow flow is about 10g ~ 20g
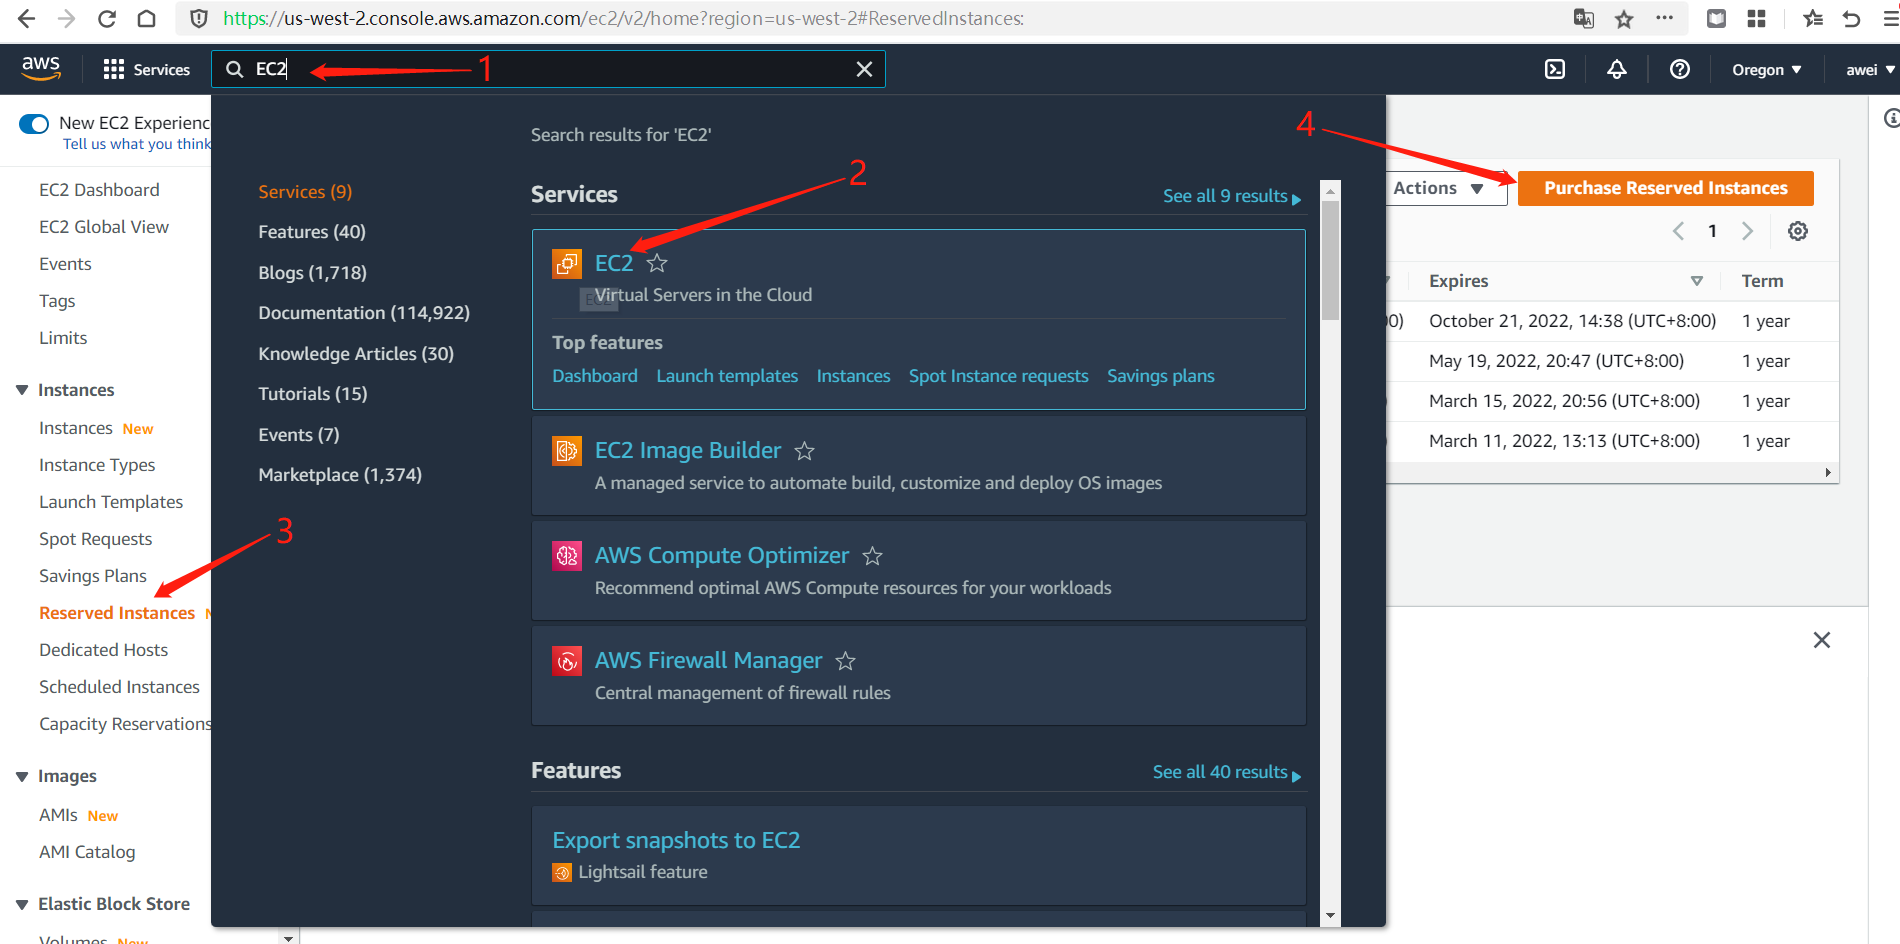
Service box search} EC2 reserved instance – purchase reserved instance 服务框搜索 EC2 预留实例-购买预留实例
- 实例类型,共识节点(C6g.large)→期限(1个月-12个月)→对款选项(预付全部费用)→4.搜索→预付价格(US$350)→所需数量(1个)→5.点击加入购物车→6.查看购物车:
- Instance type, consensus node (c6g. Large) → term (1-12 months) → payment option (prepay all expenses) → 4 Search → prepaid price (US $350) → required quantity (1) → 5 Click Add to shopping cart → 6 View shopping cart:
数据节点Data node:1.实例类型(C6g.Xlarge)→期限(1个月-12个月)→对款选项(预付全部费用)→4.搜索→预付价格(US$701)→所需数量(1个)→5.点击加入购物车→6.查看购物车:

Confirm the following information and order 确认以下信息并订购

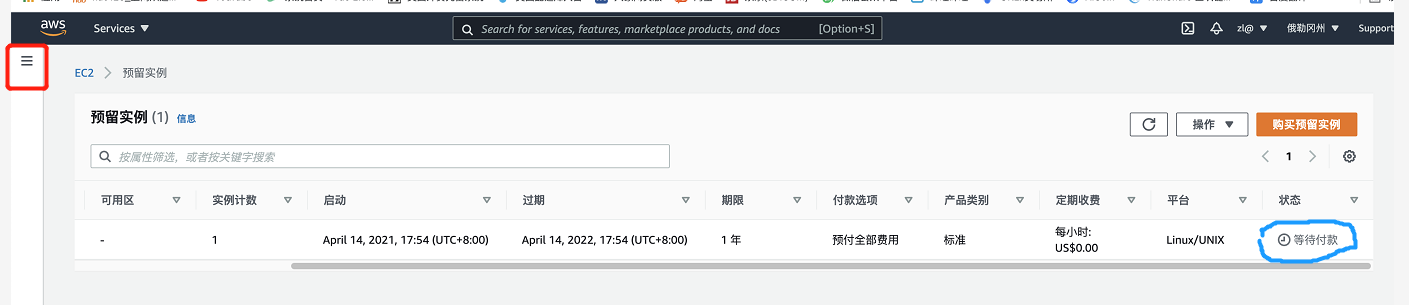
You can check the purchase status as follows. (the status of waiting for payment is a normal delay, just click the red box directly.) you don’t need to click the purchase reservation instance,. To avoid multiple purchases, click the three bars in the red box to exit the purchase page:
查看购买状态如下即可,(显示等待付款状态是正常延迟现象,直接点击红色框框即可)无需点击购买预留实例,。以免造成多次购买,点击红色框三杠退出购买页面即可:
If the purchase is successful, the server fee will be paid from the credit card, and the later traffic fee will be charged quarterly to ensure the long-term validity of the credit card
购买成功,从信用卡支付服务器费用,后期流量费用分季度收取,确保信用卡长期有效
五.2 Configure server and start配置服务器及启动
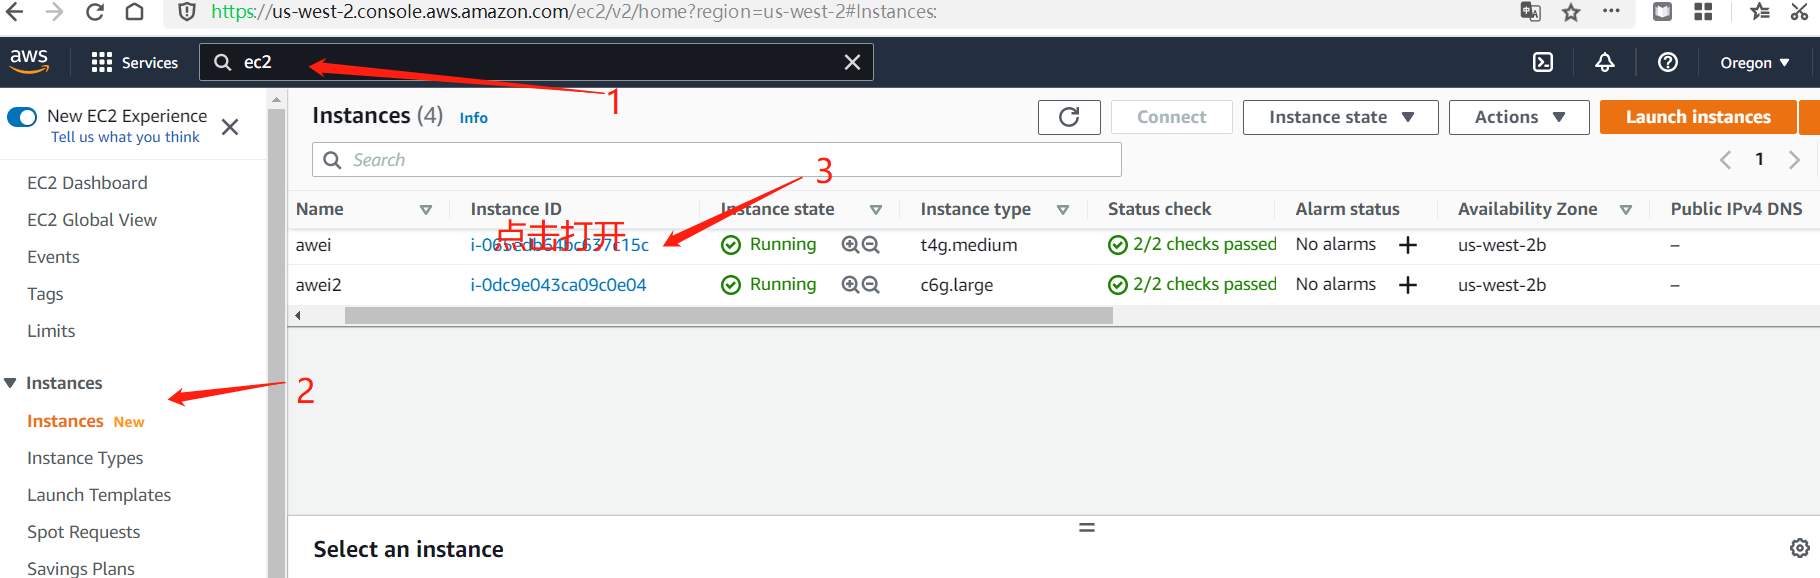
2.1 Log in to the account, click services in the figure, and then click calculate EC2 option:
登录账号,点击图中的services,再点击计算EC2选项:Instances-launch instances

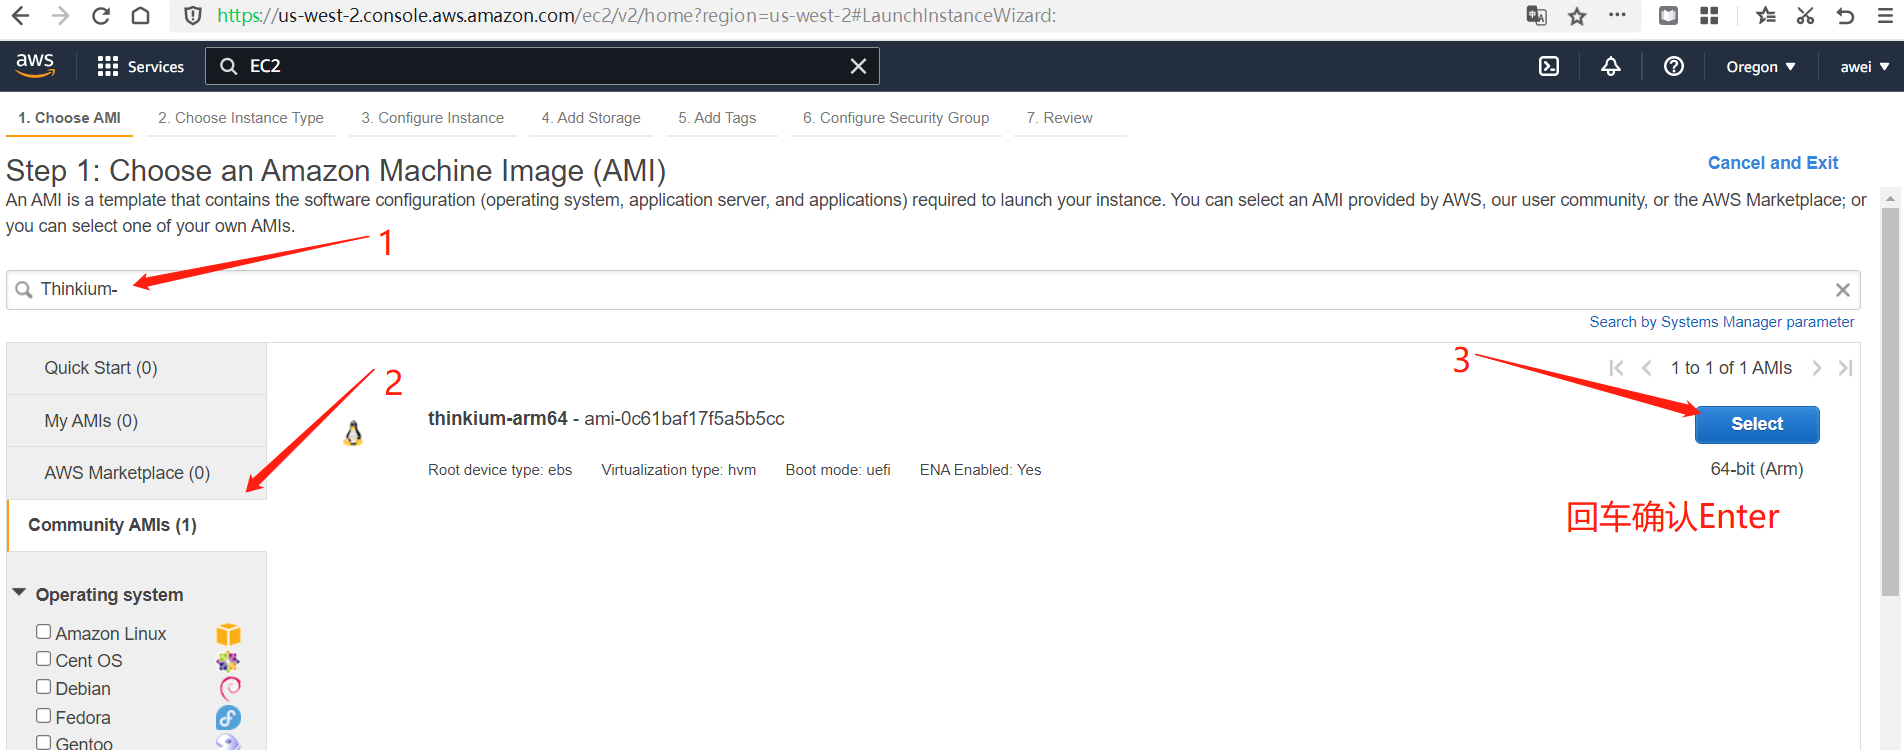
2.2 Search thinkium-arm64 and click enter → enter the community AMI page → find the corresponding public chain information (thinkium-arm64) and select and confirm:
搜索Thinkium-arm64点击回车→进入社区AMI页面→找到相应的公链信息(Thinkium-arm64)选择并确认:
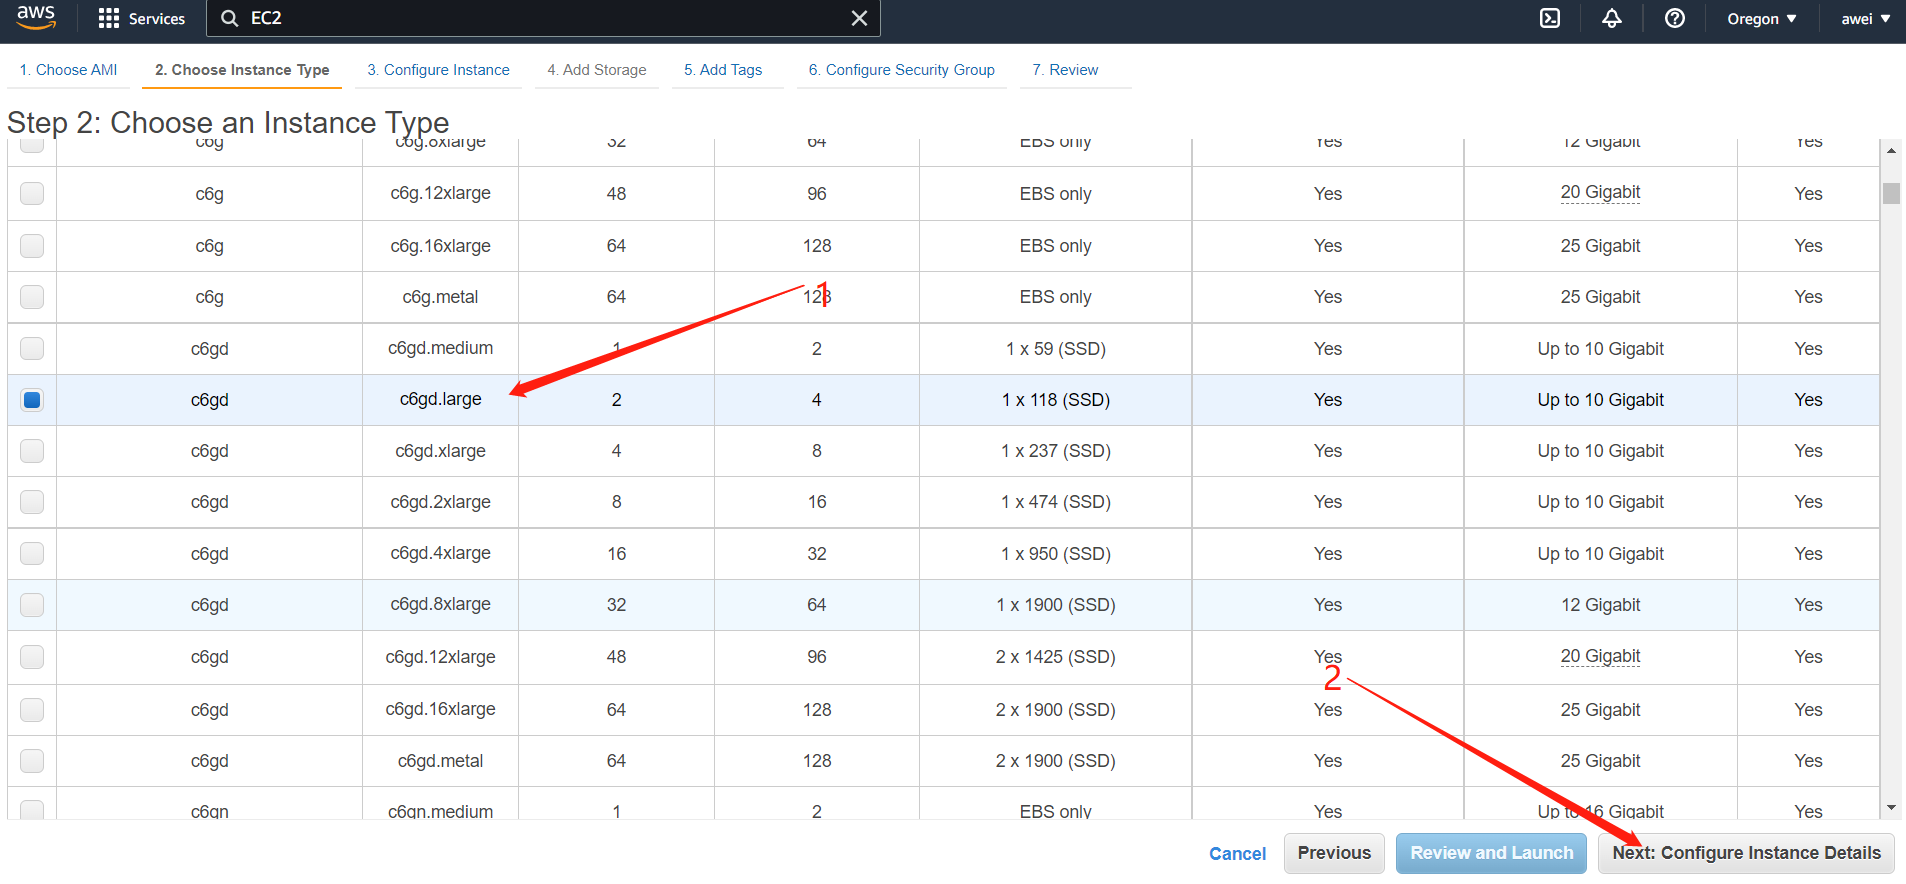
2.3 After confirming and selecting the details of the purchased instance, (consensus node) click Next:
确认并选中所购买的实例详情信息后,(共识节点)点击下一步操作:
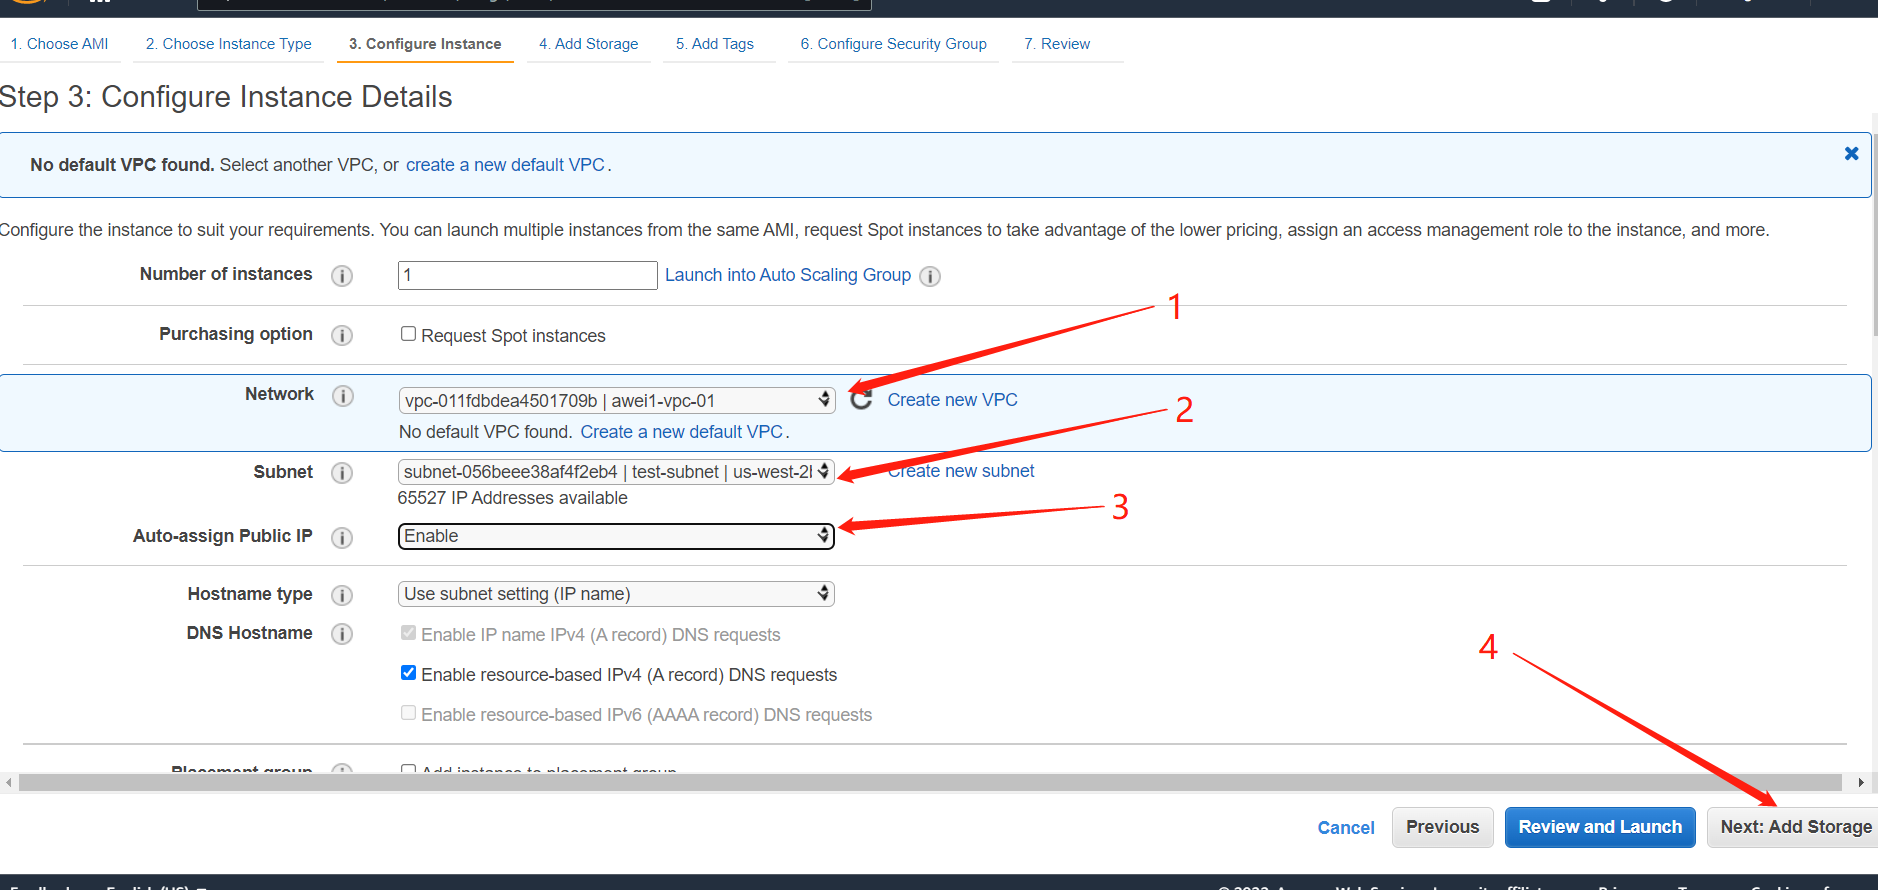
2.4 Confirm and select the correct VPC ID → 2 Select enable → 3 Next, add storage:
确认并选中正确的vpc ID →2.选择启用→3.下一步添加存储:
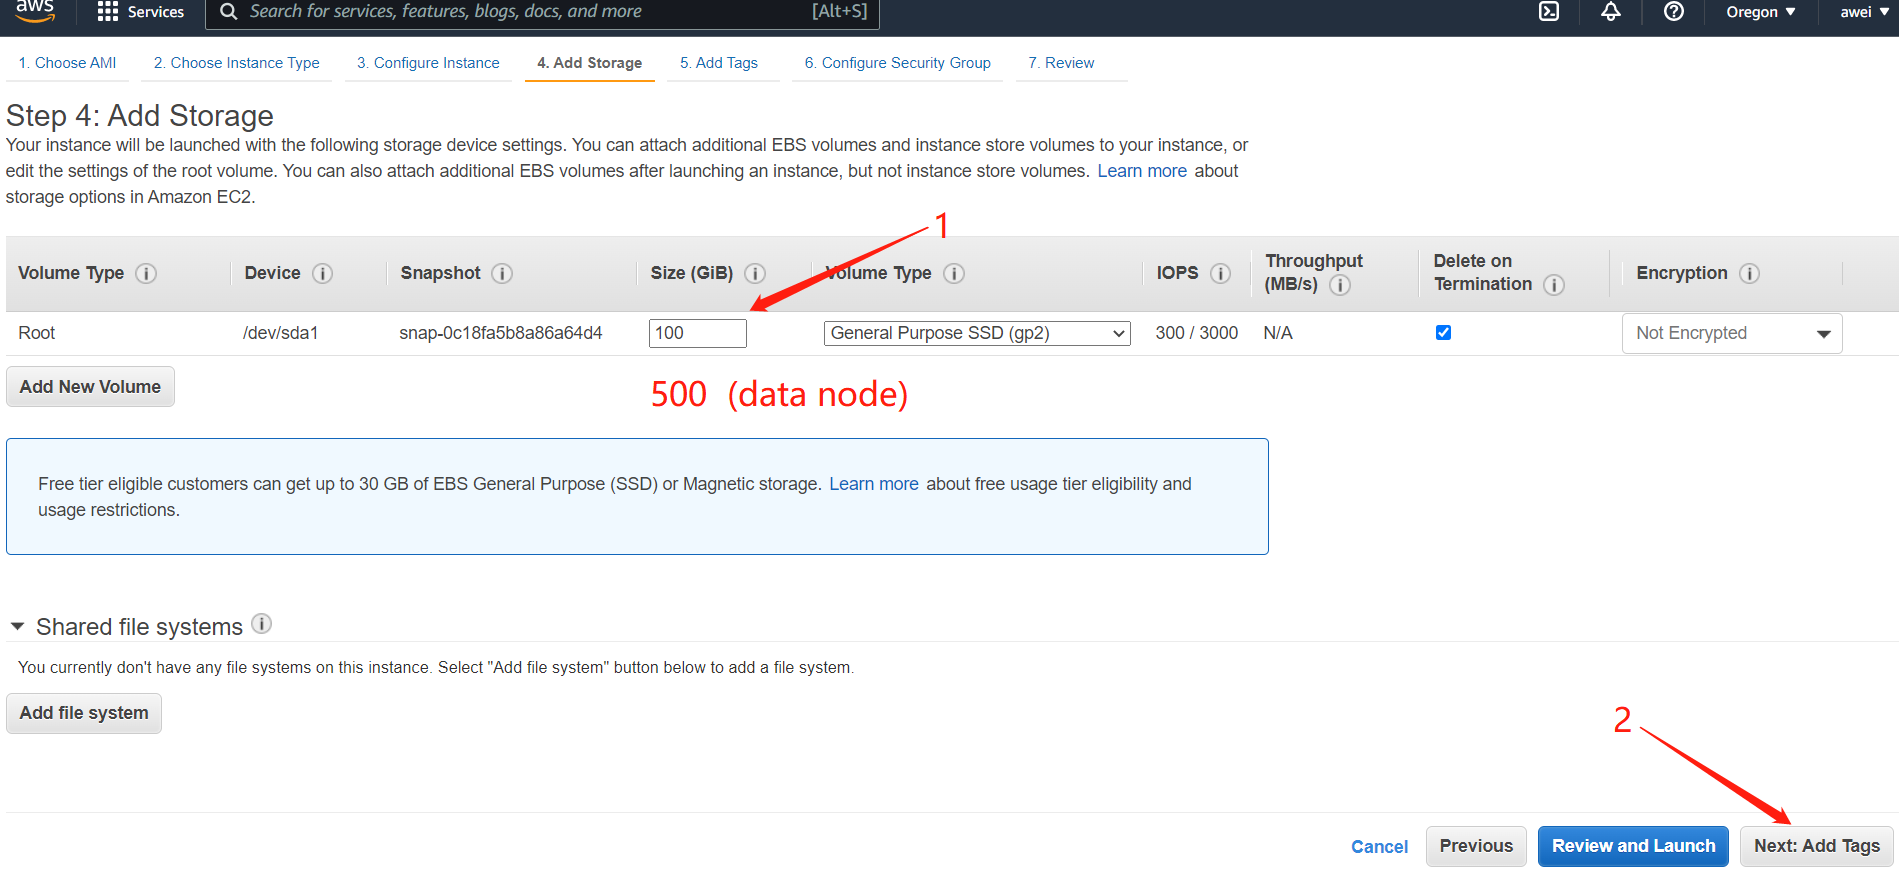
2.5 Confirm that the hard disk size is 100 gib (combined mine pool and independent node 100, data node 500) → next add label → next configure security group:
确认硬盘大小为100 GIB(联合矿池和独立节点100,数据节点500)→下一步添加标签→下一步配置安全组:
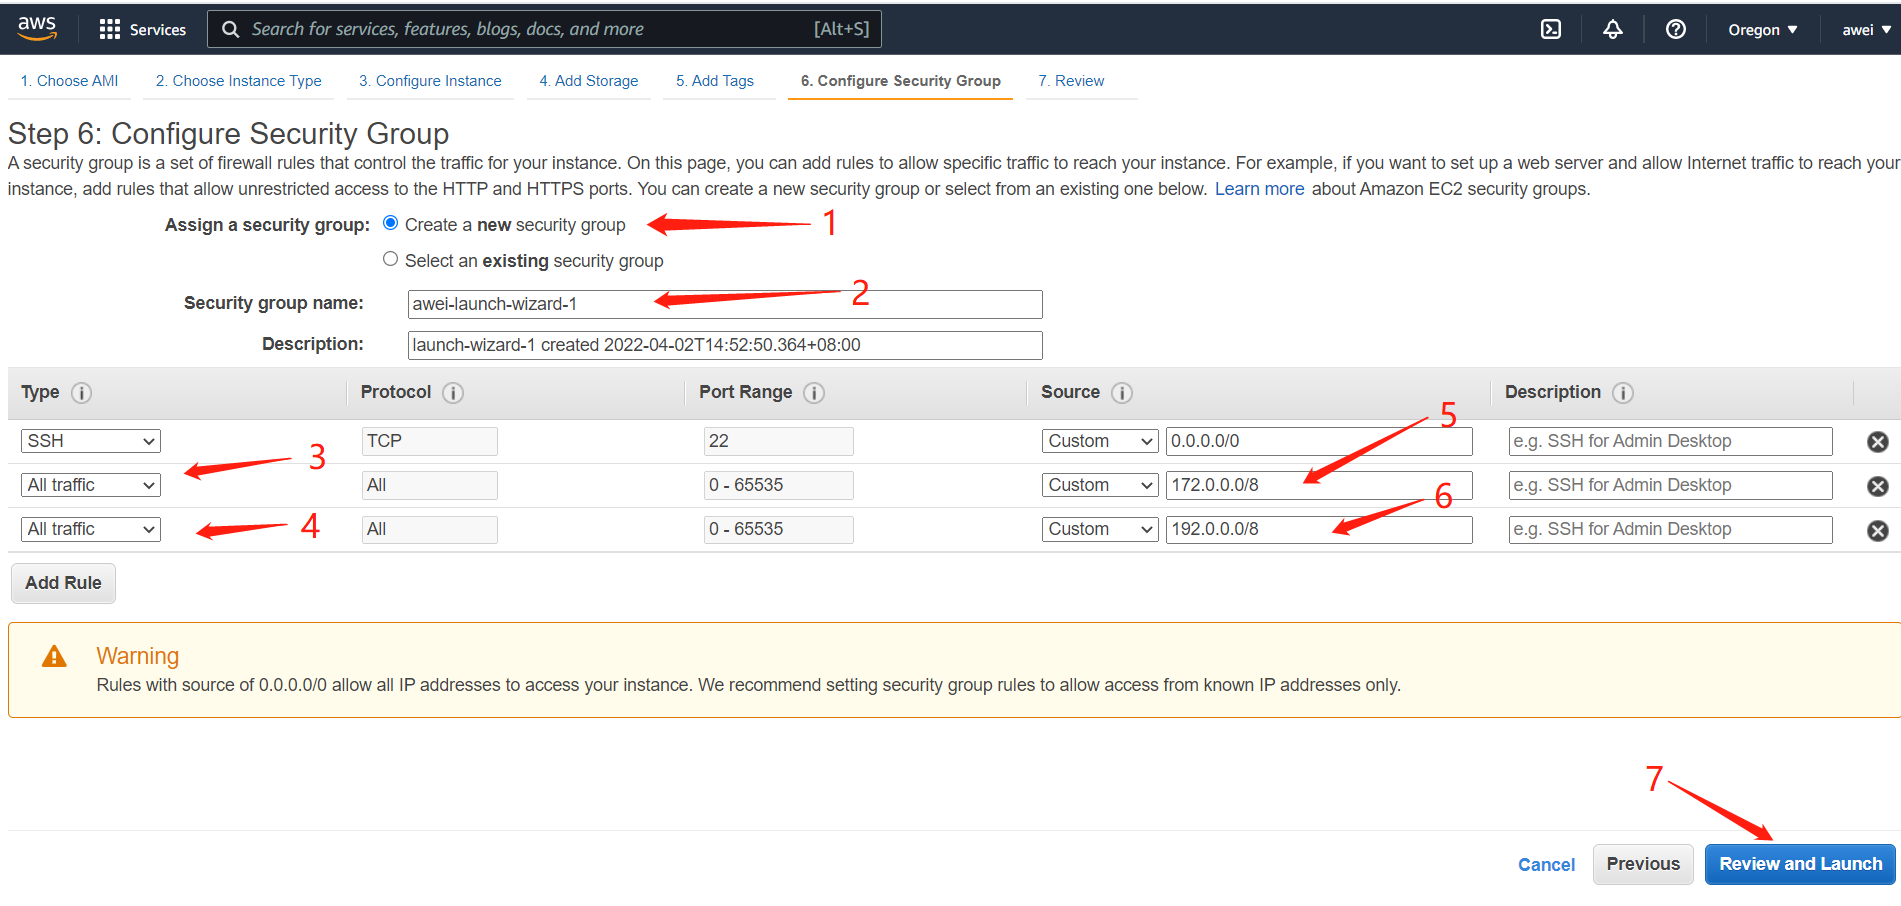
2.6 ① If there is no security group, that is, an example is purchased for the first time: (as shown in Figure 1-7 below) 1 Select Create a new security group → 2 Name the security group (the name is capitalized and abbreviated with – Launch wizard, e.g. Xiaoming, XM launch wizard) → 3 Description → 4 Add rules 172.0.0.0/8 192.0.0.0/8(one: SSH, two: all traffic) → 5 Review and launch:
①未有安全组 即首次购买实例的:(如下 图1-7) 1.选择创建一个新的安全组→2.命名安全组(名字大写简写加-launch-wizard 例如阿伟 即:awei-launch-wizard)→3.描述→4.添加规则172.0.0.0/8 192.0.0.0/8(一个:SSH 两个:所有流量)→5.审核和启动 :

Direct start直接启动

2.7 1. Name the key pair (spell the name in lowercase and end with – TKM, such as Xiao Ming TKM) → 2 (important)Download the key pair and save it to the computer (for subsequent ore drawing pool) → 3 Start a new instance:
Figure 1-10 (keep the key file properly)
1.命名密钥对(姓名小写全拼并以-tkm结尾,如小明:xiao ming-tkm)→2.(重要)下载密钥对并保存到电脑(后续搭矿池用)→3.启动新实例:

2.8 View the instance (server) and record the public IP and private IP (click 3) 查看实例 (服务器)记录下公网IP和私有IP

六CRT node registration process节点注册流程
Note: 1 Create a new text document, save it for standby, and name the document in the form of (name + node ID + node public IP private IP)
注:新建文本文档保存备用 并以 (名字+点节ID+节点公有IP 私有IP的形式命名文档)awei+awei03+64.221.233.65+172.21.49.151
- Complete the configuration in the SecureCRT software according to the corresponding steps (CRT is installed in the software installation package and registered successfully) 在SecureCRT 软件按相应步骤完成配置(软件安装包中安装CRT并注册成功)
- Open CRT, as shown in the figure, click the following steps, 1 Click the plus sign and check that the protocol is SSH2, 2 Click Next directly: 打开CRT,如图点击以下步骤,1.点击加号并查看协议为SSH2 , 2.直接点击下一步:
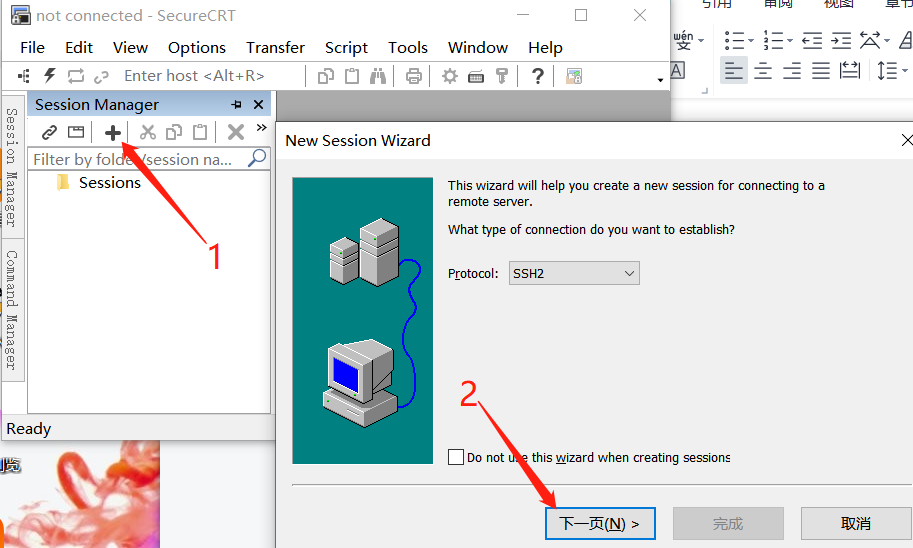
3.输入公有IP,4.直接点击下一步,完成 :3. Enter public IP, 4 Click Next directly: complete
1 Right click the newly established IP server (properties – SSH publickey properties use session public key setting) and select the key pair downloaded when the AWS server is started
右键刚建立好的IP服务器( Properties -SSH-Publickey-Properties-Use session pubic key seting) 选择AWS服务器启动时下载的密钥对 OK
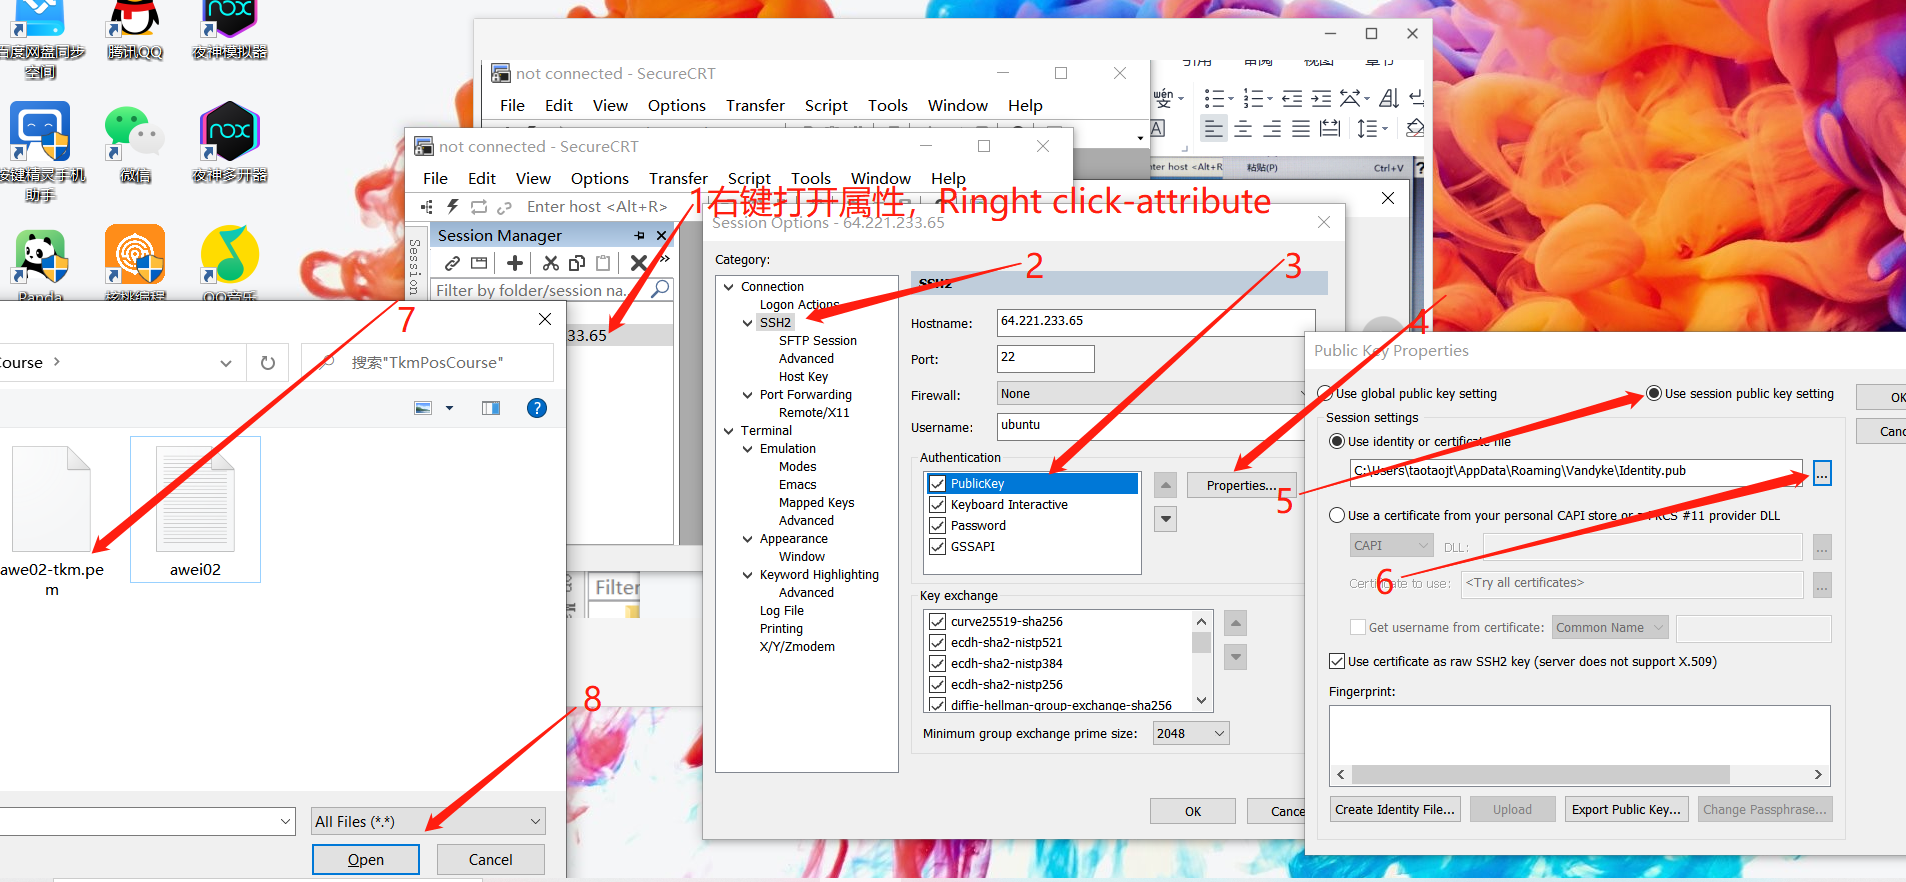
2点击SSH2 , Hostname: ip 2.点击Publickey(点字母),3.username输入:ubuntu,4.点击属性:
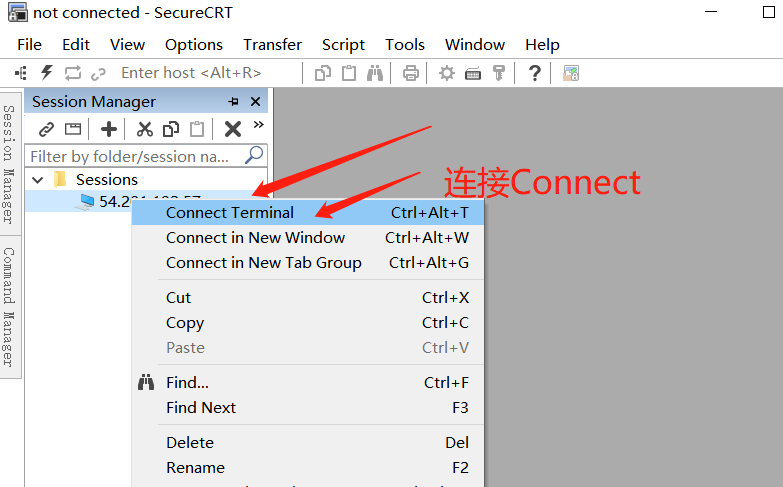
保存好配置后,连接到服务器 After saving the configuration, connect to the server


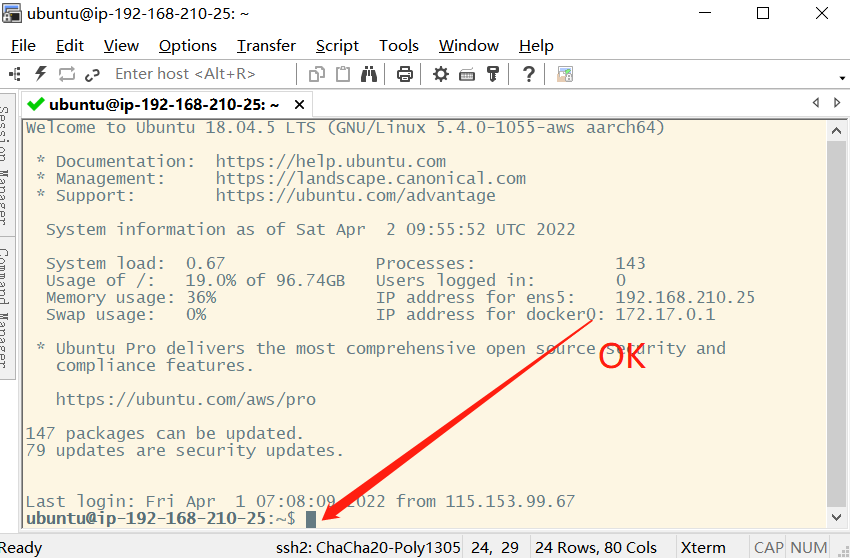
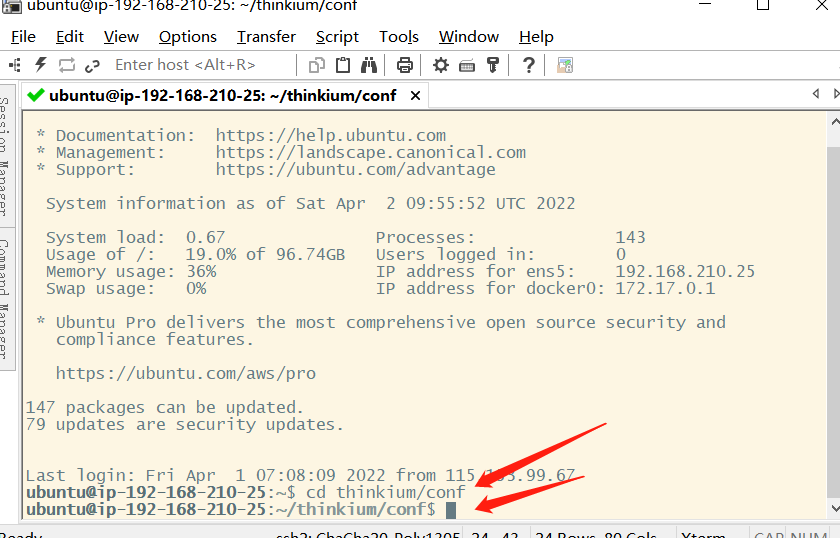
- 输入以下节点代码 Enter the node codes
1、cd thinkium/conf/ 复制 →按右键粘贴至CRT →按Enter启动 Copy → right click Paste to CRT → press enter to start
2、输入命令:genkey 复制→按右键粘贴 →按Enter启动 复制:Privkey、Pubkey: NodeID:黏贴在前面新建的文本文档中。
Enter the command: genkey; copy → right click Paste → press enter to start; copy: privkey, pubkey: nodeid: paste in the previously created text document.


3.输入下方命令 复制 →按右键粘贴至CRT →按Enter启动Copy → right click Paste to CRT → press enter to start
docker run -itd -e CONFNAME=dvpp0.yaml –network host –name thinkium -v /home/ubuntu/thinkium/data:/home/ubuntu/thinkium/data -v /home/ubuntu/thinkium/conf:/srv/chain/config -v /home/ubuntu/thinkium/log:/home/ubuntu/thinkium/log thinkium/go-thinkium:latest
- 查看日志是否启动成功命令: docker logs -f –tail 200 thinkium 点回车 没有error报错即为成功
- Check whether the log is started successfully: docker logs – F — tail 200 thinkium click enter and no error is reported
注意:be careful: On the premise that the server of the node is normal in Amazon, if the node is abnormal, it can be restarted through the following code:
节点的服务器在亚马逊显示是正常的前提下,节点异常 可以通过以下代码重启:
docker stop thinkium
sudo rm -rf /home/ubuntu/data/data0
docker start thinkium
2、Postman Node registration 节点注册
- Import the registration script, import through postman, open the software package import – find POS 211025 postman_ Collection script – click OK – Import
- 导入注册脚本,通过Postman导入,找开软件包导入-找到PoS 211025.postman_collection脚本-点击确定-导入
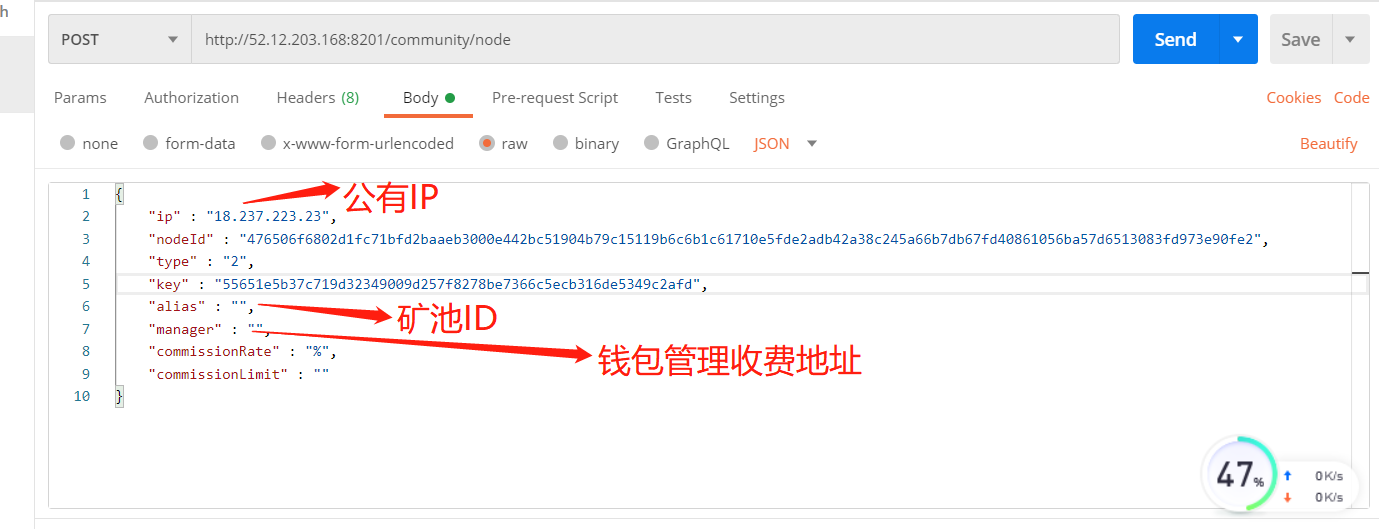
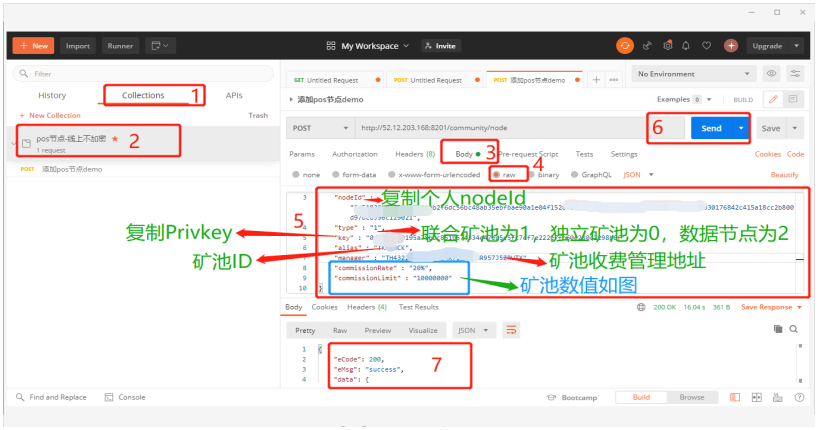
ip(Public IP ):64.221.192.57 alias(矿池名): awei02 nodeid:(六.2复制得到) Copied commissionRate:管理费费率,例如20%
manager:矿池主地址(Main address of ore pool),例如(for example)TH861ZROBWFAZQVVS3XWA2F1EDHUF41ENTD
Type:联合矿池为(Consensus node)1,独立矿池为0,数据节点为2。
设置完成 提交 ( Send ) Setup complete submission
- After the modification is completed, click send, and then wait. The call result success will be returned
- 修改完成后,点击发送即可,然后等待,会返回调用结果success
七Wallet mining operation钱包挖矿操作
After completing the deployment of one to six nodes, contact the administrator on discord or telegram to go online, and then carry out POS operation in Tuke wallet 完成一至六节点部署完成,在Discord或电报上联系管理员上线即可在TUKE钱包中进行POS操作
- https://thinkium.net/ 基金会官网下载钱包安装TUKE Download wallet and install Tuke on the foundation’s official website
2.打开TUKE,创建或导入钱包,1在POS页面点立即挖矿(Mine now) 2搜索框输入矿池名前面建立的(awei2)搜索 3下方搜索到的矿池点击进入,显示矿池信息,4输入需要质押的TKM数量千为单位,点立即挖矿 (新矿池第一次质押在1万TKm以上,产出收益在一到两周查看)
Open TUKE, create or import a wallet, 1 click mine now on the POS page, 2 enter the mine established in front of the mine pool name in the search box, 3 Click to enter the mine pool information, 4 enter the number of TKM to be pledged in thousands, and click to mine immediately (the new mine pool is pledged above 10000 TKM for the first time, and the output income is viewed in one to two weeks)